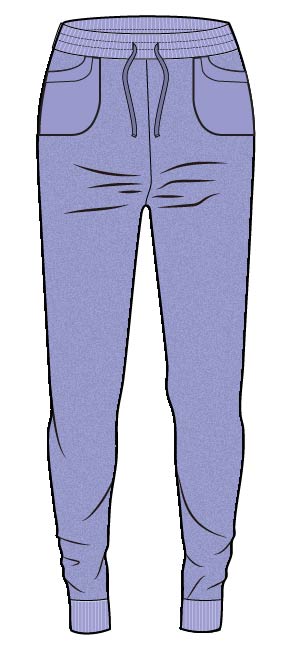
Why don’t my pants fit well?!
Do you think learning tips and trick for pants fitting is hard? Have you ever wondered why your pants pull or bunch in weird places? Does your back waistband gap? Or you always seem to have a bit of a wedgie or extra fabric where you shouldn’t? Have you ever wondered why you prefer the fit of a certain brand over another? Or WHY your pants don’t quite feel right even though you followed the size chart and are wearing the correct size?
The reason is this: even though all manufacturers use a standard set of measurements, our bodies do NOT. You may have followed the hip measurement for your size, but your back rise is higher and crotch curve is totally different. Your thighs may be much thinner (or thicker). You may have a fuller tummy or a rounder upper bottom. There are as many combinations of how your body contours work together as there are stars in the sky and it’s simply not possible for an off the rack pair of pants to fit all of them exactly. I swear you can learn proper pants fitting techniques!
Patterns follow the same set of measurements that ready-to-wear manufacturers do with a different goal in mind. RTW uses these measurements to try and find the ‘average.’ They attempt to hit the middle of the road so that they have the greatest chance of fitting the most people the best. Patterns, on the other hand, are drafted to give seamstresses the best template off of which to make individual fit adjustments. There is NO magic pattern that will fit so many different bodies perfectly. If you sew a pattern exactly as is without taking your personal fit needs into account, it will fit exactly like store bought pants. This is why we sew! So that OUR pants that we sew to fit our own individual bodies end up looking so much better than what we could buy in the store.
It is also VERY IMPORTANT to remember you are not a mannequin! You move! Don’t be a wrinkle hound. You are not striving for 100% perfection. It’s easy to get caught up in looking at every little line and wrinkle and forget to see the big picture of how awesome you look. Yes, a few wrinkles will clue you into issues, but you can learn to recognize these signs and become a pants fitting expert!
It is also important to note that ANY TIME you are adding on to your inseams or outseams, it will change the overall vertical length of that seam. You will need to even out your hems before finishing the leg.
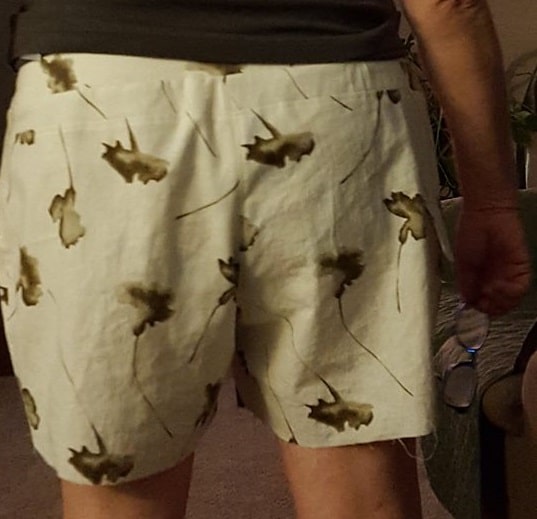
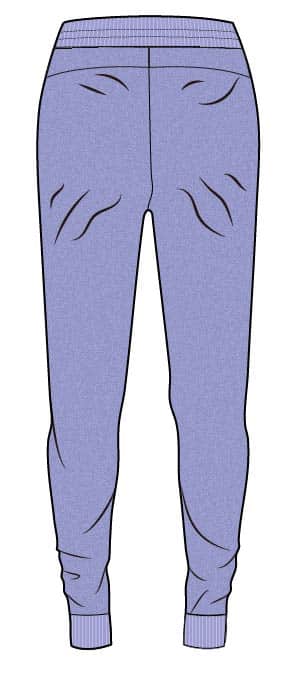
Excess Fabric on Inner and Outer Thighs
If you feel like your pants are flapping in the breeze and just way too loose, you may want to reduce some of the width across the thighs and possibly down the leg.
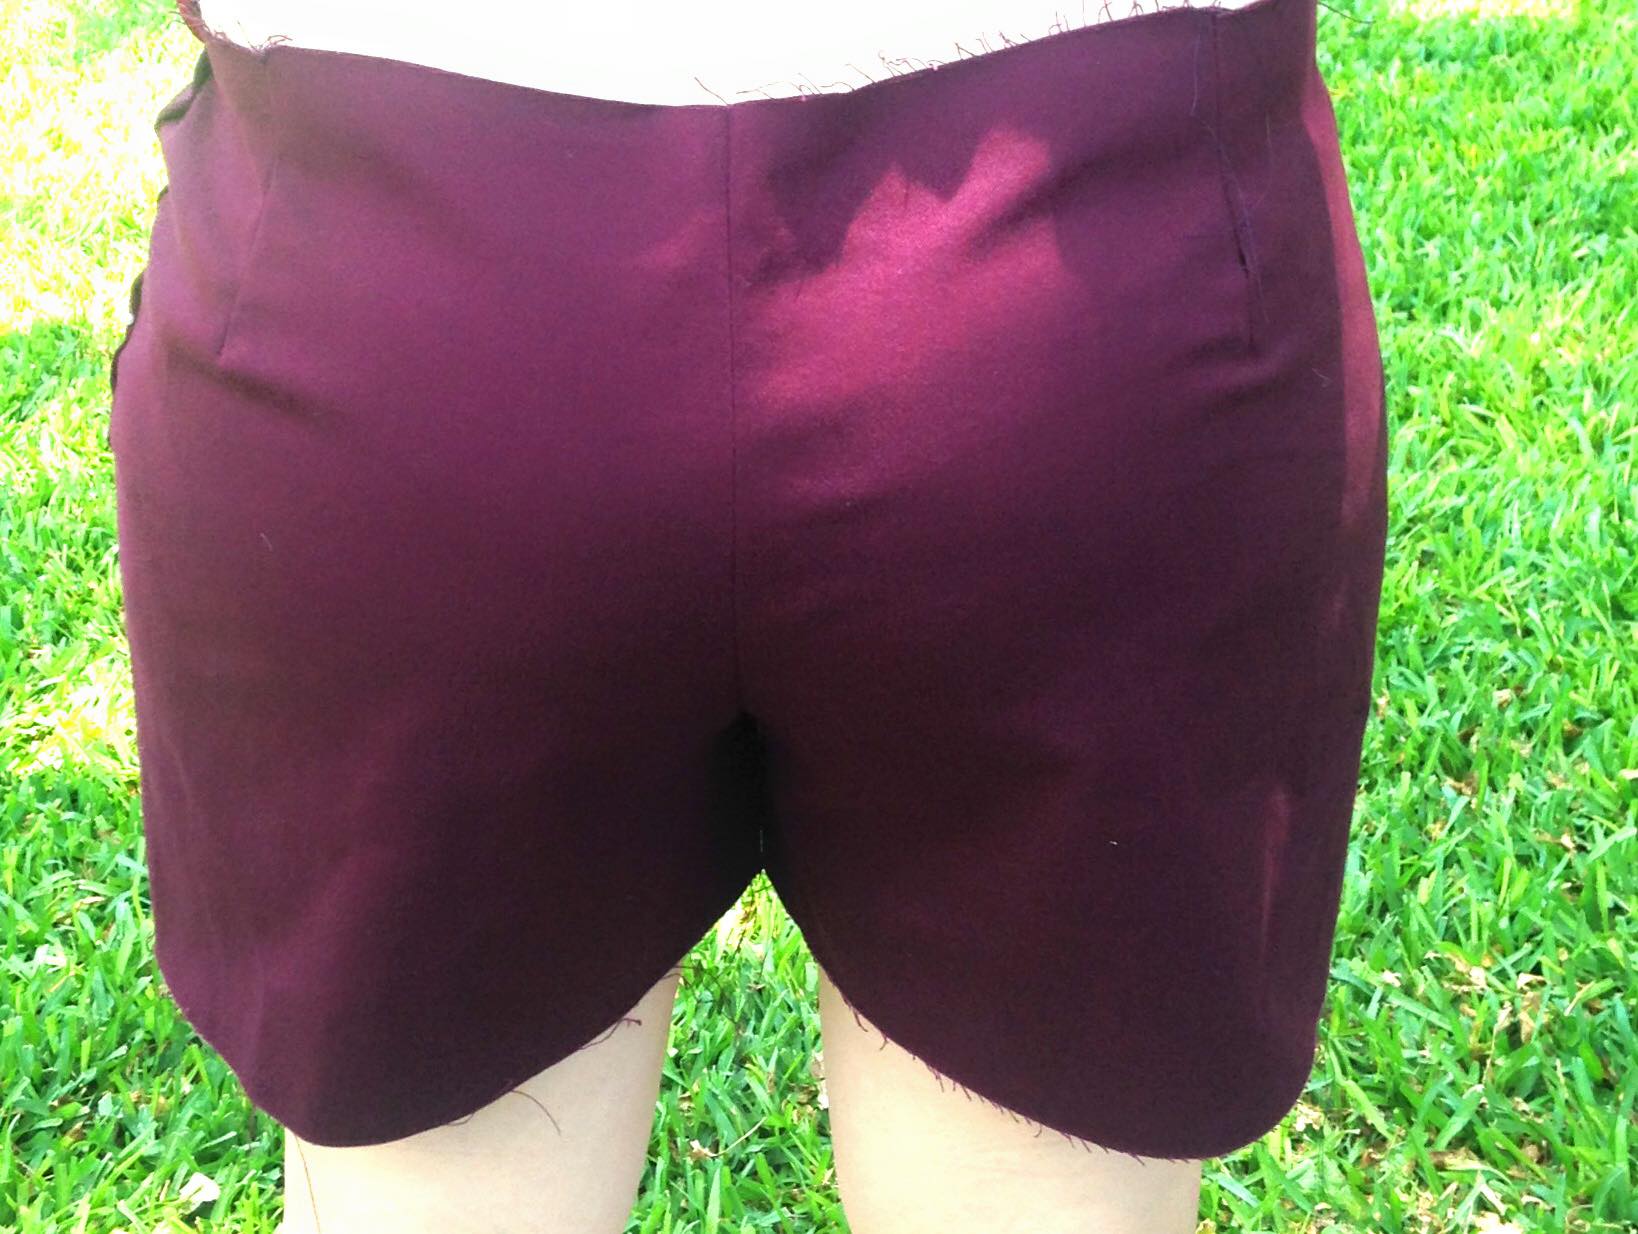
This is an example of a pair of shorts where the leg is too loose. You should divide the total adjustment across 4 areas – front and back inseam and front and back outseam. Spread it evenly across all four areas.
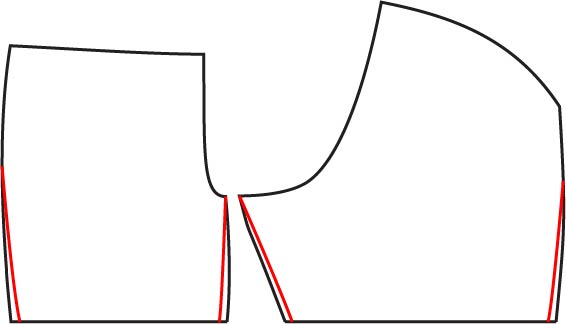
Excess Fabric on Inner Thighs
If your inner thighs are thinner than your pants, you will see excess fabric and vertical drag lines along the inside of the thighs. You will need to reduce the width of the inside. The easiest way to do this is to turn your pants inside out, pinch out the excess fabric and baste. Try them on again and if you like your adjustment, make sure to transfer it to your pattern piece. You will reduce the width of the inseam on both the front and back pattern pieces. Start your taper AFTER the crotch point (you do not want to make your crotch curve smaller unless there is a second fitting adjustment you intend to make).


Excess Fabric on Outer Thighs
If your outer thighs do not fill out your pants, you will see fabric pooling on the back of the thighs, with drag lines towards the outseam. It will be most obvious on the back, but you may see similar lines on the front as well. Put your pants on inside out and pinch out the excess fabric. Baste and retry. If you like how much you have slimmed, transfer to your pattern. You will need to remove width from the front and back outseams equally.
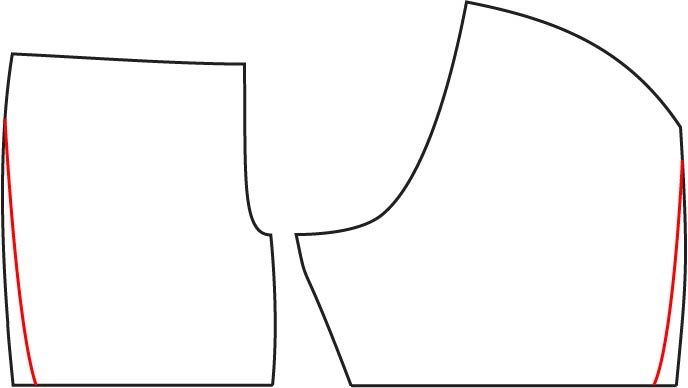
Full Inner Thigh Adjustment
Fabric wrinkles and pulls to try and cover your inner thigh. If you have ‘smile lines’ on your rear – it’s not happy! Also, if wrinkles are prominent in the front, check to see if a if a full seat adjustment is needed as well.
Add on to the front and back inseams, a little at a time until your inner thighs have enough room.

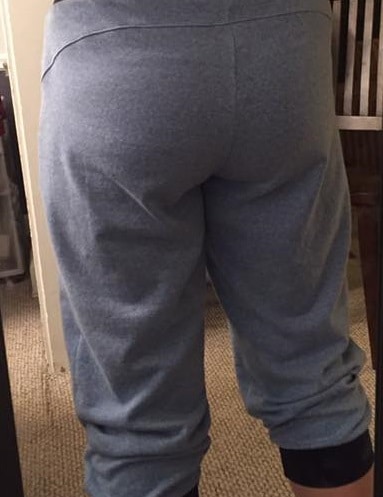
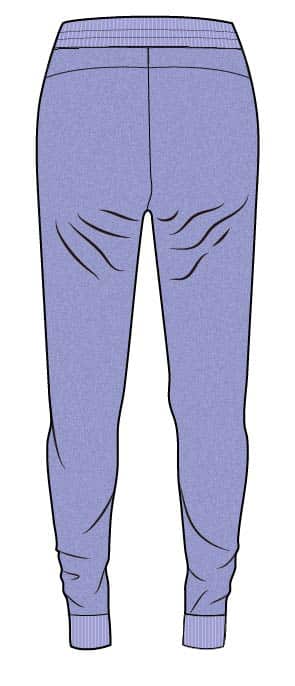
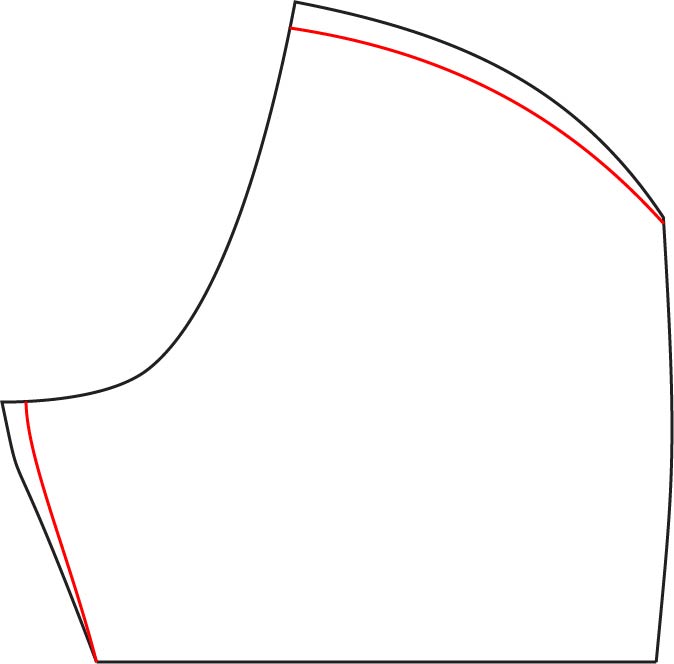
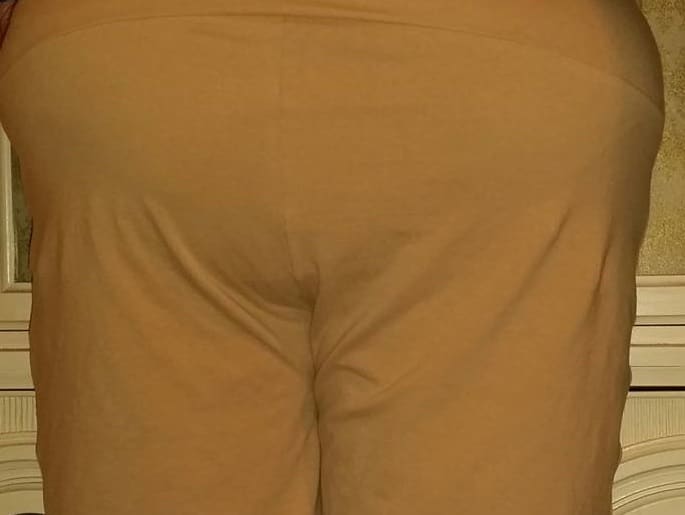
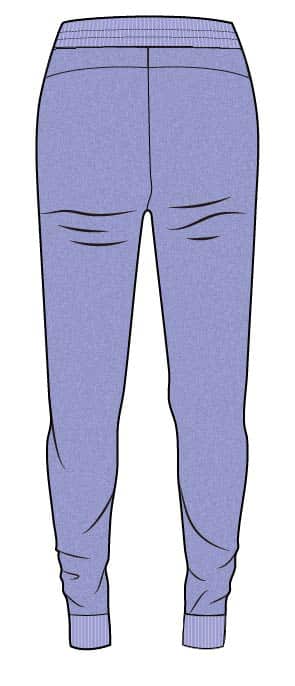
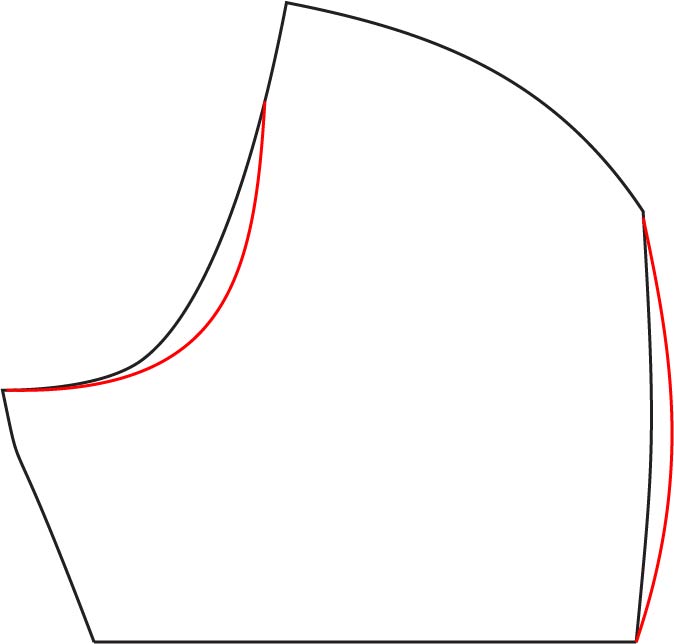
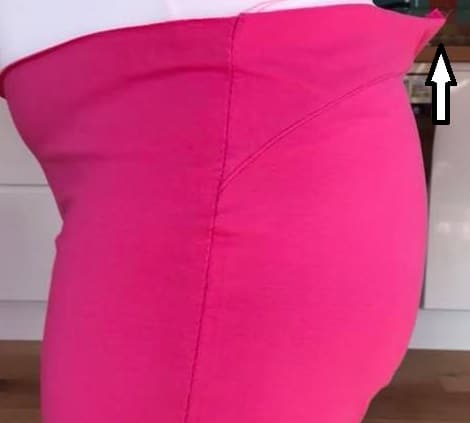
Full Outer Thigh Adjustment
Look for diagonal wrinkles from crotch pointing to outer thigh, where fabric is tight and pulling. Fabric may also bulge above thighs because fabric is pulling it up. If you have lower hips (“saddlebags”) this adjustment can help.
You will need to add to the outseam with the greatest amount in line with the crotch line. You’ll want to divide the total amount you need to add between the front and back pattern pieces. You can add a total of up to 3/4” for up to size XL and 1” for sizes above XL. Blend seam line from above hip line and to upper thigh (approximately the shorts line). If you find this adjustment isn’t enough, you may need to also do a Low Butt adjustment or try the Tin Foil Crotch Curve method.
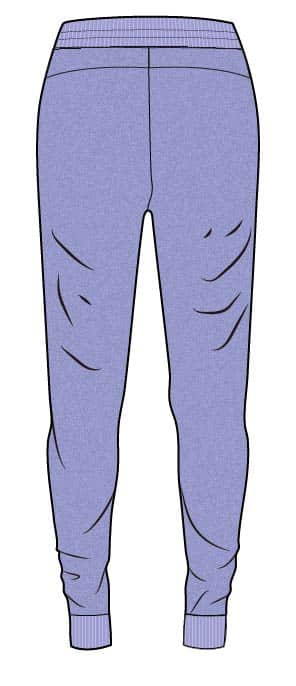
Full Inner and Outer Thigh Adjustment
You will see wrinkles pulling horizontally across thighs and at the side seams as well as whiskering at upper inseam.
Divide amount you want to add between inseams and outseam. Blend the inseam adjustment from crotch point to upper thigh. Blend the outseam adjustment from above hip line to upper thigh. Match the changes on back to changes on the front.
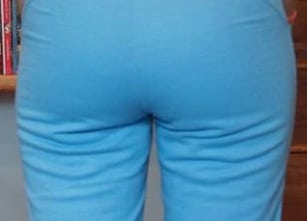
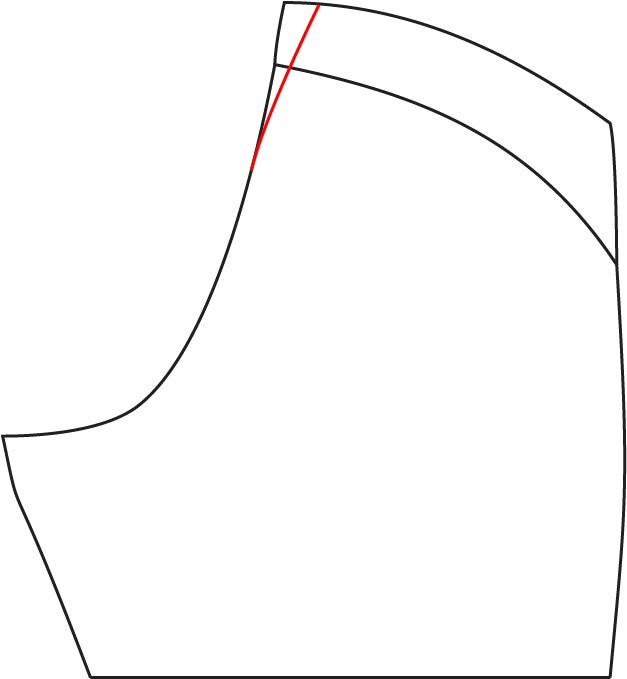
Full Seat Adjustment
If you are blessed with a round, full derriere, you may find you need this adjustment. Wrinkles will pull from the back seam and diagonally away from contours of your tush. Your back rise might feel like it’s being pulled downwards as well. The easy method for adding a small amount is to just add length to the crotch point and top of the rise.
However, if you’re adding more than 1/2”, you’ll want to slash your pattern and spread out the back crotch curve so you are adding length to the back crotch and the center back. Keep in mind that a full seat adjustment is sometimes paired with a low seat adjustment–so if you have a full seat AND you have horizontal wrinkles under your bottom, or a wedgie, you may want to scoop out the curve as well as lengthen it. If you scoop out the curve, add a little width to the hips so you maintain the same amount of fabric across your hips. Read the fitting suggestions for Low Butt Adjustment for more in depth instructions.
Flat Seat Adjustment
When your tush does not have enough flesh to fill out your shorts, your pants will sag below the crotch in the back. You will need to decrease the crotch length. You may also need to shorten your back rise. If you need to shorten your back rise more than 1/2”, you will need to do a more in depth pattern modification. Check out the fitting section on Decreasing Rise.
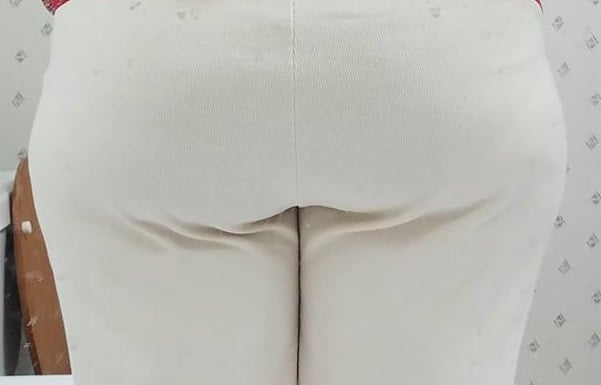
Low Butt Adjustment
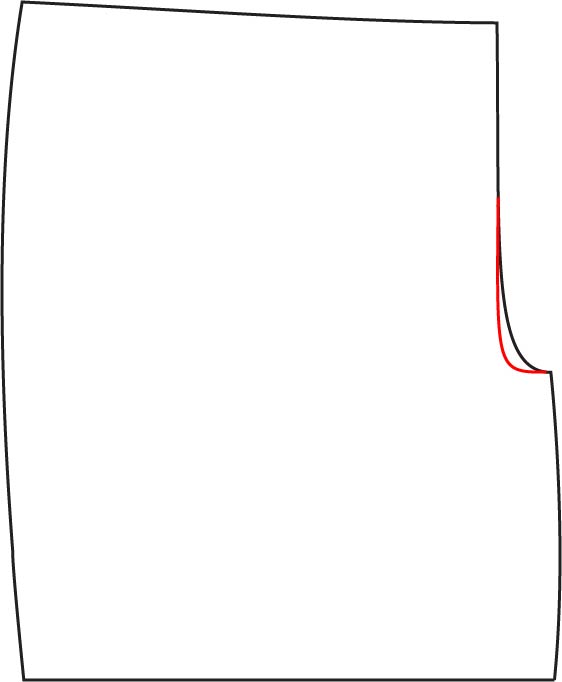
If the biggest part of your bum falls lower than ‘average’ (and thus how the pattern is drafted), you will have horizontal wrinkles under your tush indicating that your tush is pushing the fabric down. You may also have a wedgie. To fix this, scoop out the back crotch in order to lower the crotch curve. You will need to add whatever you scoop out of the crotch curve to the outseam to maintain enough fabric. If you have full outer thighs as well, you may need to make a larger adjustment.
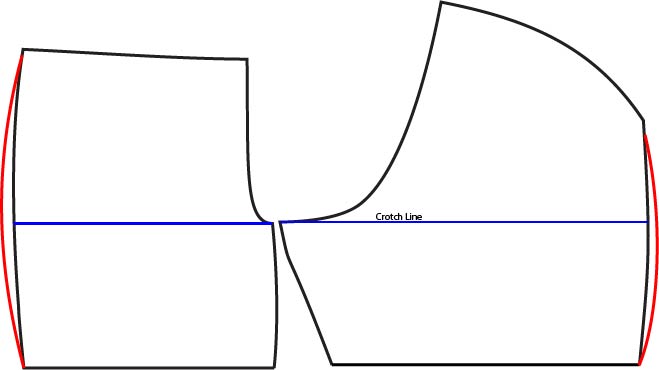
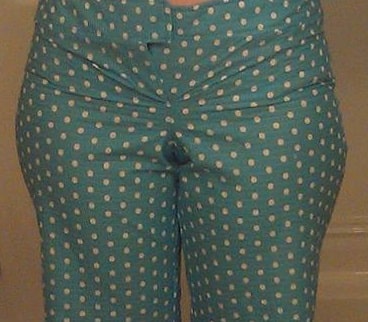
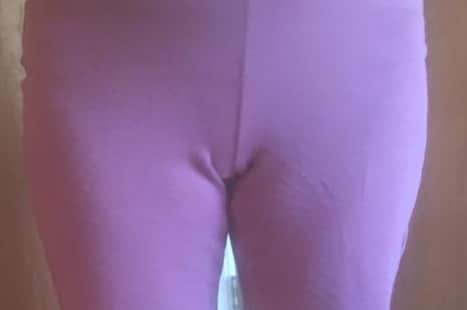
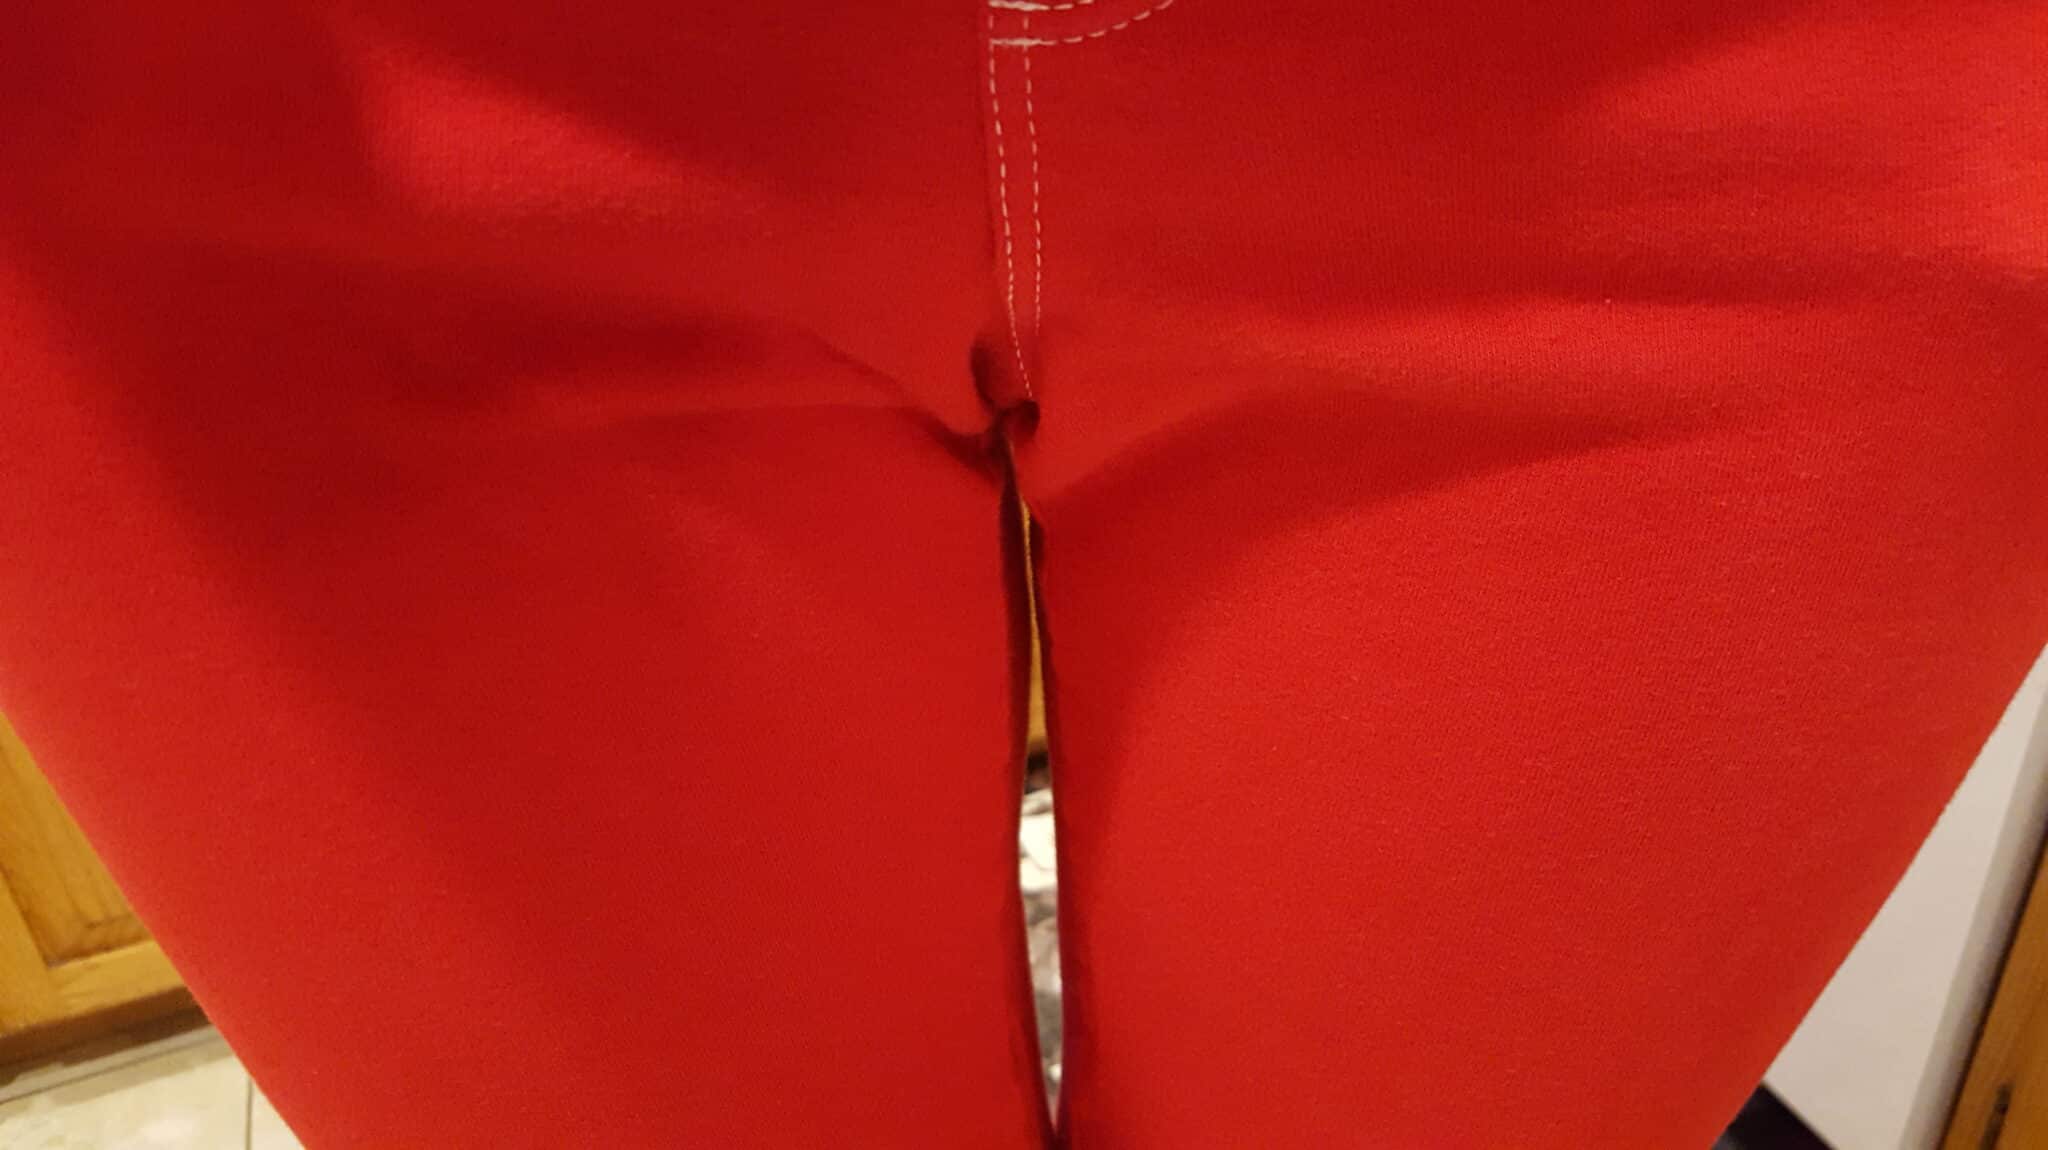
Round Pubis Adjustment
If you find that your front crotch is showing off a lot more than you would like, you may need a round pubis (also known as a ‘prominent pubis’) adjustment. (We will add that to the growing list of odd things I end up saying to speak candidly about fitting butts and crotches.) This will show up as vertical wrinkles around the front crotch. You will need to scoop out that front crotch curve to make room for your body’s curvature. Changes as small as 1/8” to 1/4” will make a big difference, so go slowly!
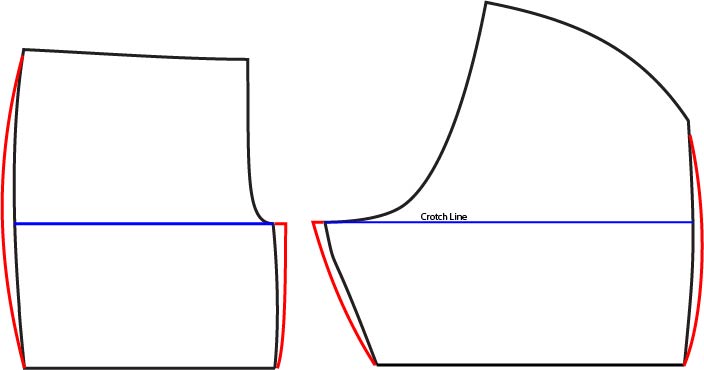
Flat Pubis Adjustment
If you have loose wrinkles that look like cat whiskers radiating from your crotch (hmmm…that sounds weird), your pubic bones may be set a little further back than how the pattern is designed. To fix this, you will need to make the front crotch curve straighter. This is an adjustment that should be done in small increments. 1/8” to 1/4” can make a big difference in how it feels (and looks).

Sway Back Adjustment
Sway Back is one of the less recognizable fitting adjustments. We often don’t recognize it exists because it manifests in the small of our back (where we can’t readily observe it). We just know something doesn’t fit correctly back there. What exactly is a sway back? It means that your pelvis is tilted forward (to varying degrees). This is sometimes due to the natural curvature of your spine and sometimes due to your posture (think the pose a gymnast makes at the end of an event) – or both. No matter the reason, if your pelvis tilts forward, it reduces the length of your center back. As a result, shirt (or dress) fabric has a tendency to pool or fold up in the small or your back. For pants, you will find the center back sticks out away from your back if your waistband is not yet attached. After attaching the waistband, the yoke will look all bunchy. The methods for altering a shirt pattern are quite different than a pants pattern and we are going to focus on the pants portion for this post. There is a complicated professional way slash and spreading with multiple hinges (if you are interested, there are some great fitting books out there or you can check out this post from Colette Patterns). For our purposes, I will keep things quite simple. Turn your pants inside out and pin out the wedge of extra fabric through your yoke and down to the top of your back crotch seam (further down if necessary). Baste the wedge and try your pants on. If it’s good, you are going to need to make the same adjustments to your pattern. Once you draw your adjustments on to your pattern, you will need to blend the line at the back crotch seam so it is smooth. You WILL also need to decrease your back waistband accordingly. You may also need to Decrease your Rise.
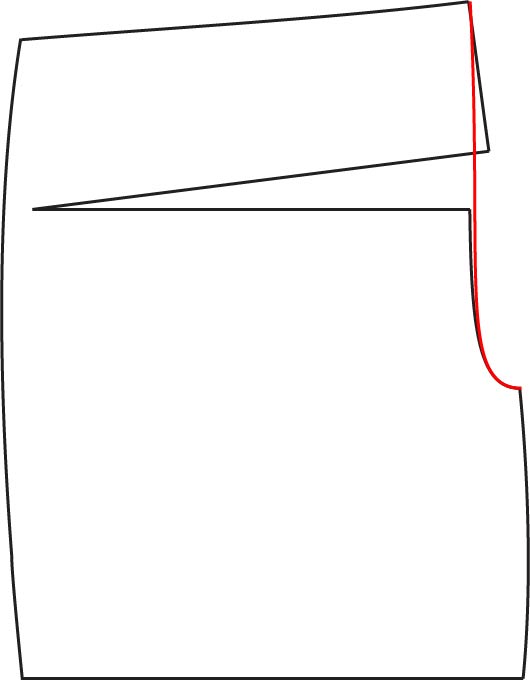
Full Tummy Adjustment
If you have a larger waist than hips, you may find this adjustment helpful. You may see diagonal lines pulling from your tummy to your hips, bubbling at the side seams, your side seams may pull toward the front at your waist, and the crotch might feel a little tight in front if your waist is causing your pants to ride up.
The simple method is to slash your pattern from front crotch to hip, about halfway down the crotch length, stopping before going through the hip. Spread your waist to add more room. Put paper behind your pattern and tape. Blend lines.
For the more in depth/correct version, check out this video from the 5oo4 Sewing School (this is for Boardshorts, but the method is the same).

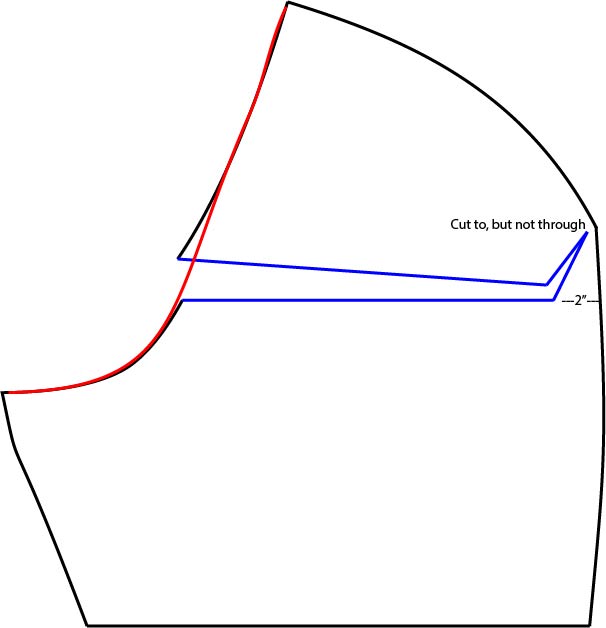
Decrease Back (or front) Rise
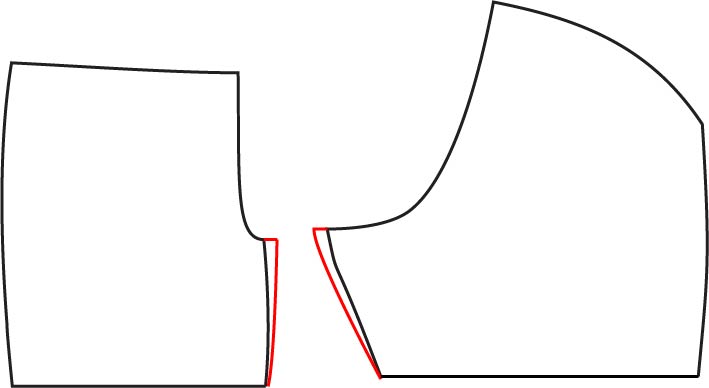
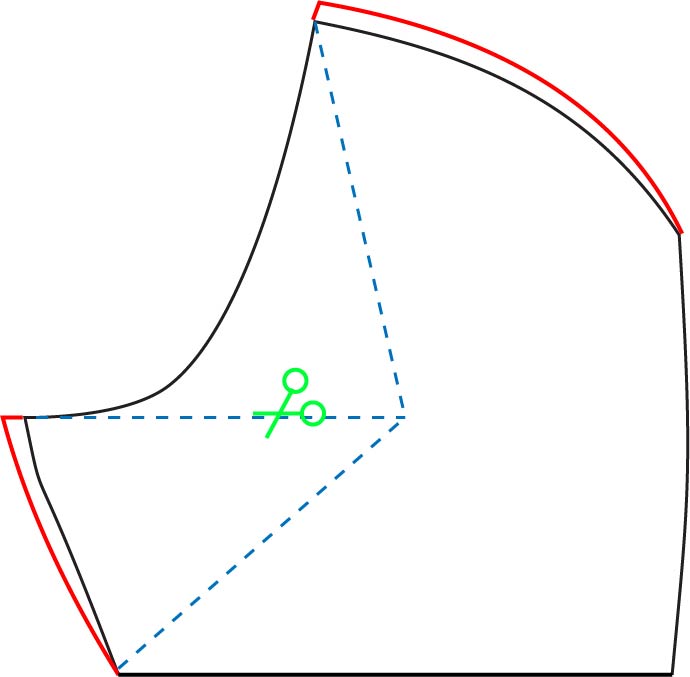
If you are petite or have a shorter torso, you may find that the back rise is too high. You will see extra fabric bunching up under the yoke on your back seat seam. To reduce the rise without altering the shape of the top where the yoke attaches, the slash and spread method is the most efficient. NOTE: In pants patterns where multiple front rises are not available, this method will work for the FRONT rise as well.
Make a horizontal line midway down the back seat seam and carry it across until approximately 2” from the outseam. Then make an angled second line up to the outseam corner (don’t go all the way – stop about 1/4” from the edge). You will cut along that line so that the top becomes a hinge. Place your paper behind your pattern and pivot the hinge down. You will need to blend the seat seam curve afterward.

Increase Back (or front) Rise
If you are tall or have a longer torso, you may find that the back rise is too low. You will feel the back rise being pulled down and may have a wedgie when you try to hike your pants back up. To increase the rise without altering the shape of the top where the yoke attaches, the slash and spread method is the most efficient. NOTE: In pants patterns where multiple front rises are not available, this method will work for the FRONT rise as well.
Make a horizontal line midway down the back seat seam and carry it across until approximately 2” from the outseam. Then make an angled second line up to the outseam corner (don’t go all the way – stop about 1/4” from the edge). You will cut along that line so that the top becomes a hinge. Place your paper behind your pattern and pivot the hinge up. You will need to blend the seat seam curve afterward.
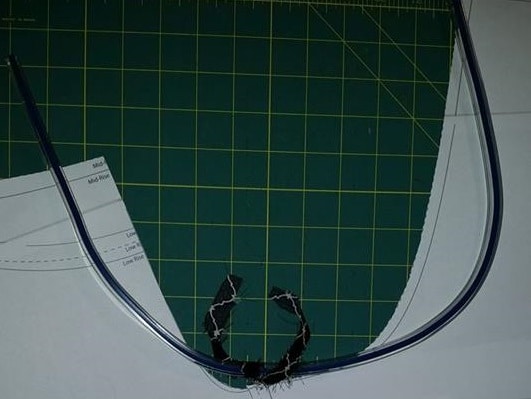
The Tin Foil Crotch Curve Method
You may have heard of the tin foil crotch curve method. It’s a more advanced fitting skill, but can be a life saver. There are some of us whose crotch curves are very different than standard drafting. If you have attempted smaller adjustments to your muslins and you feel that although the fit is ‘better’ it’s not where you want to be, this method can be very illuminating. However, you will need to have a basic understanding of how your body fits in to the pants fitting adjustments above to be able to interpret your individual curve correctly.
First, take your front and back pattern pieces and overlap them at the crotch point (use the seam allowance).To make the curve, take a long piece of tin foil (24” or so) and roll it into a long rope (a flex ruler works very well too). Wearing a pair of leggings or in your underwear, thread the foil through your legs and mold it to your curves, front and back. Mark the foil with a clip (or rubber band if using a flex ruler) at the point where your inseams come together. Carefully remove the foil and lay it on your pattern pieces and take a good look.
The crotch curve is not an exact science. You do not want to trace it exactly. It’s more of a guide to use along with your knowlege and intuition. Please see the 5 out of 4 Tin Foil Crotch Curve Blog Post for more in-depth instructions and guidance. We have also made a VIDEO! And as always, the 5 out of 4 Facebook group is a wonderful place to get help and support!
Reader Interactions
Comments
Trackbacks
-
[…] Now that we have addressed FEAR let’s talk about FIT. The ninja leggings pattern was designed to have the gusset, but like any sewing pattern you may find it necessary to make some alterations to best suit you and your body. Adding the gusset should NOT result in the appearance of excess fabric in the crotch area. If this is happening you may need to make a fit alteration such as a flat pubis adjustment. Have no idea what that is? Check out the pants fitting guide blog post to see if any of these alterations might be helpful to you: Pants Fitting Guide blog post […]
-
[…] Pants Fitting Guide by 5 out of 4 […]
-
[…] into the pants fitting adjustments. You can find a handy guide in identifying your individual needs HERE. It is a more advanced fitting skill, but I believe anybody can at least gain some insight into […]
-
[…] here. I’ve also seen examples of full tummy adjustments on a few other sites including the pants fitting guide at 5 out of 4, as well as this very detailed video from In House Patterns Studio. I used the concepts from both […]
-
[…] fitting page. And still a lot of pooling on the back thigh. My Googling led me to this page, and this is very interesting – some of the alterations are very different from my usual […]
-
[…] 5 out of 4 – Pant Fitting Guide – this is worth reading – just to see where all the pant fit issues are and what they are caused by – great illustrations […]
-
[…] lines pointing towards her inner thigh? It looks like the pattern could use an accommodation for full inner thighs! I’d want to scoop the back crotch to be more of a “J” shape, as the need for a full […]
Great article. I appreciate that you this on a page without advertising so it is easy to print out for reference.
This is a fantastic tutorial on pant fitting! I so appreciate your article! I have never been able to make pants (am new to sewing) and am going to attempt pants soon! I’ll definitely refer back to your article!
This is informative & really funny at the same time! Thanks so much!!!
Good article. I have been trying to get a pattern for my full thighs & round but.
Is the back leg wider than the front? I know @ the crotch it is but then should the legs be of equal width? I always make a dark color knit and have trouble seeing what’s wrong with the back fit.help
Back legs are generally wider than them front. If your side seams are not falling straight or you see significant wrinkles then the fabric is being pulled and needs more room.
Thank you for this article. I have followed all of the advice. I have a flat rear end and narrow thighs and hips. I have adjusted for these and the pants look great. The only problem is when I walk the back pulls down. Any advice? I know it isn’t the waist band is snug and the back has darts.
Is it possible you have round and/or muscled front thighs? (I do, and I can put my pants in a comfortable place, but then the moment a leg swings forward the back of the pants pulls down. Also, to avoid pull lines when standing still, I have to awkwardly push my hips forward about 3 inches into a bad posture.)
Hi Laurie, I apologize that we did not see this comment sooner. If you are still in need of fitting help you can ask in the main 5 out of 4 facebook group, or you can email [email protected] for us to better assist you.
This is one of the best explanations I’ve ever read for fitting pants. I have bookmarked it and will be referring to it regularly. Thanks!
I think this is one of the best and most thorough fitting guides I have seen. Thank you for sharing this.
Thank you this explanation is brilliant, easy to understand and very helpful.
I have been looking for the reason for the opposite of “excess fabric on outer thighs” which no one addressees. Diagonal pull lines from the outer thigh toward the front. Another problem is too tight at knee, if you bend your knee. When I found some stretch pants big enough in the thigh and butt, the waist was almost up to my bust.
thankyou!
Unbelievably helpful post — I was having a hard time figuring out how/where to add back in to the hip line the fabric I’d removed to try and adjust for a wedgie, but I found this and your diagrams explained everything! Thank you!
Please help. My pants pull into the bottom of the cheeks What must I do.
Thanks
This could be a number of things. One is you need to lower the back crotch curve if your tush is lower than the pattern’s shape. This will keep it from sitting too high to begin with. But- if it’s happening when you walk, that could be a different issue altogether.
Sometimes in store bought or self made Bermuda length pants the fabric rides up between legs when walking. I can’t seem to solve this problem.
This could be an issue of the fabric getting caught on your thighs or just a natural effect from thighs rubbing together when you walk. Making sure there is enough ease in the legs so the fabric can fall back into place can help.
This is such a helpful resource! I altered a pair of shorts for a big booty based off your instructions above. It worked great. But now there is an excess of fabric in the front crotch area. It looks too big. Should I now adjust pattern for a flat pubis like you’ve indicated above? Thanks I’m advance!
If you could send me a picture, I can get a better understanding of what you’re dealing with and try and help. [email protected]
What is the reason for folding the back of the leg, which is almost cascading towards the knee, in the pattern?
It’s hard to say without seeing a picture. It could be that it’s just too big on the outside of your leg and, depending on where it starts, your hips.
This is the best pants fitting guide. So helpful. I return to it over and over again as I have a long torso, short legs and need both a full thigh and full seat adjustment. I’m in the process of making my first pair of jeans and your guide once again helped me get the best fit possible.
I literally have half of these issues on my one body! No wonder “off-the-rack” clothes don’t fit (especially pants). I am hoping to start drafting some clothes and finally get some pants that fit right or at least a lot better! This information is awesome. Thank you for sharing.
I’m having a terrible time when walking, my pants pull up my legs from the knees to the crotch in diagonal folds of fabric
on the inner legs. How do I adjust this?
Hi Pat, I apologize that we just saw this comment. If you are still in need of fitting help, you can ask in the 5 out of 4 facebook group or you can email [email protected] and we can assist you better.
I am only just 5ft high seeking jeans/jeggings inner leg 27cm, a length promised by the labelling on rails of clothing in M&S ,ASDA, TESCO, PRIMARK and suchlike. The sales staff tell me that of the five lengths theoretically offered, the two shortest, 25cm and 27cm are “hardly ever asked for” and are therefore not routinely stocked., They then direct me to school uniform rails, which I have already investigated. I have tried shortening jeans myself, but this only resulted in a waste of time and money, as chopping off a slice from the bottom of the leg made the whole length of the trouser look much more baggy than it should be at my particular size. I suppose we really are getting taller, as we are always being told. I am trying once again to find something I would consider worth buying, Having read your excellent article, long and detailed as it is, shows me that there are people who understand fitting problems I am prompted to ask if you have any observations. Please accept my commendations,whether you chose to answer me or not. Rita Cowell
This is STELLAR! Love being able to identify and fix issues with my pants!
OMG! This article is amazing. I am working on pants right now. I copied my pants from existing commercial pants I own. I am going to try them and fix whatever fitting problem arises thanks to your tutorial. I don’t have enough words to thank you.
I’ll edit my comment as soon as I finish my pants.
Hi there,
The pants I made pull up at the Inleg seam when I am walking.
How do I alter the pattern to prevent this happening?
Thank you
Pull up…where? A picture would make it easier to help. Is it a 5oo4 pattern? It’s hard to know how to help without more information.
Do your inner thighs rub together when you walk? If yes, I can’t help. But if no, you need to extend your crotch shelf a bit, a bit meaning 1/8” or 1/4” maybe that would also help if your thighs are rubbing together.
Amazing article, exactly what I was looking for! I’ll come back here for more tips next time I run into issues.
Thanks for this article and for the YouTube video. I finally was able to customize a pattern for my daughter, who always had the problem of her cheeks being exposed – even as a young child. We adjusted the front pelvic curve depth, which caused the pants to be pulled forward when she sat or walked, as well as the front and back rise. We will probably have to do a full inner and outer thigh adjustment, but this tutorial helped us make something that will fit and stay up. Thank you.
Dziękuję za kompletną wiedzę! Nareszcie wiem jak to robić. Wykorzystam te wiedzę w praktyce. Pozdrawiam.
This the the best visual guide I’ve seen. I have watched YouTube videos but a lot of them don’t visually show, they talk about it but do visually show how to fix it. This article has both, I find this a lot easier to understand. Thanks so much!
Help!! I have vertical pull creases at the rear center belt loop below the waistband. How can I correct this? every video I see is about horizontal creases.