The Tin Foil Crotch Curve Method
You may have heard of the tin foil crotch curve method. There are some of us whose crotch curves are very different than standard drafting. If you have attempted smaller adjustments to your muslins and you feel that although the fit is ‘better’ it’s not where you want to be, this method can be very illuminating. However, you will need to have a basic understanding of how your body fits into the pants fitting adjustments. You can find a handy guide in identifying your individual needs HERE. It is a more advanced fitting skill, but I believe anybody can at least gain some insight into their body curves by giving it a try. Honestly! It’s just paper and fabric!
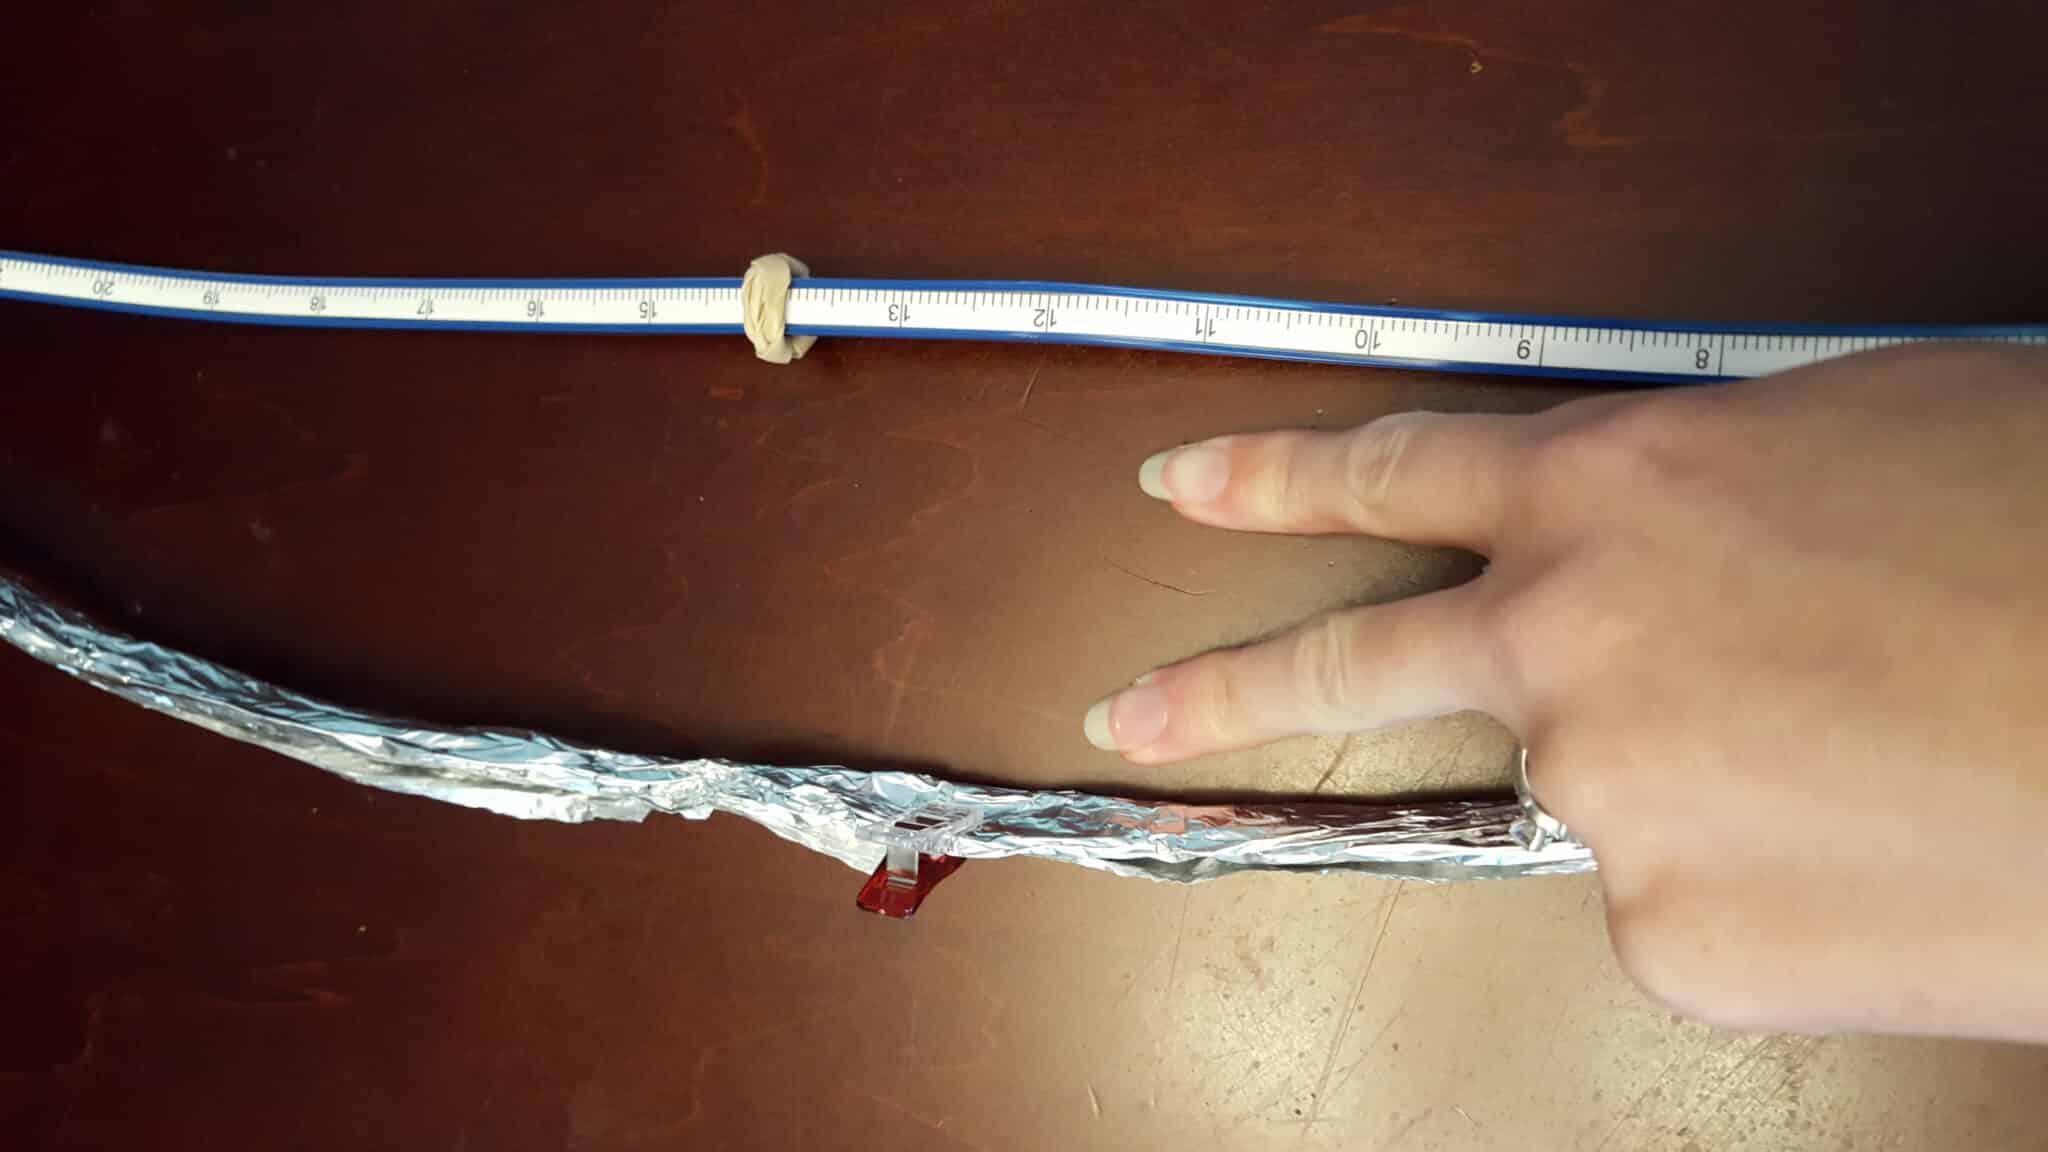
To make the curve, take a generous piece of tin foil (24” or so) and roll it into a long rope (a flex ruler works very well too). I put a clip on the tin foil and a rubber band on the flex ruler. We’ll use that in the next step.

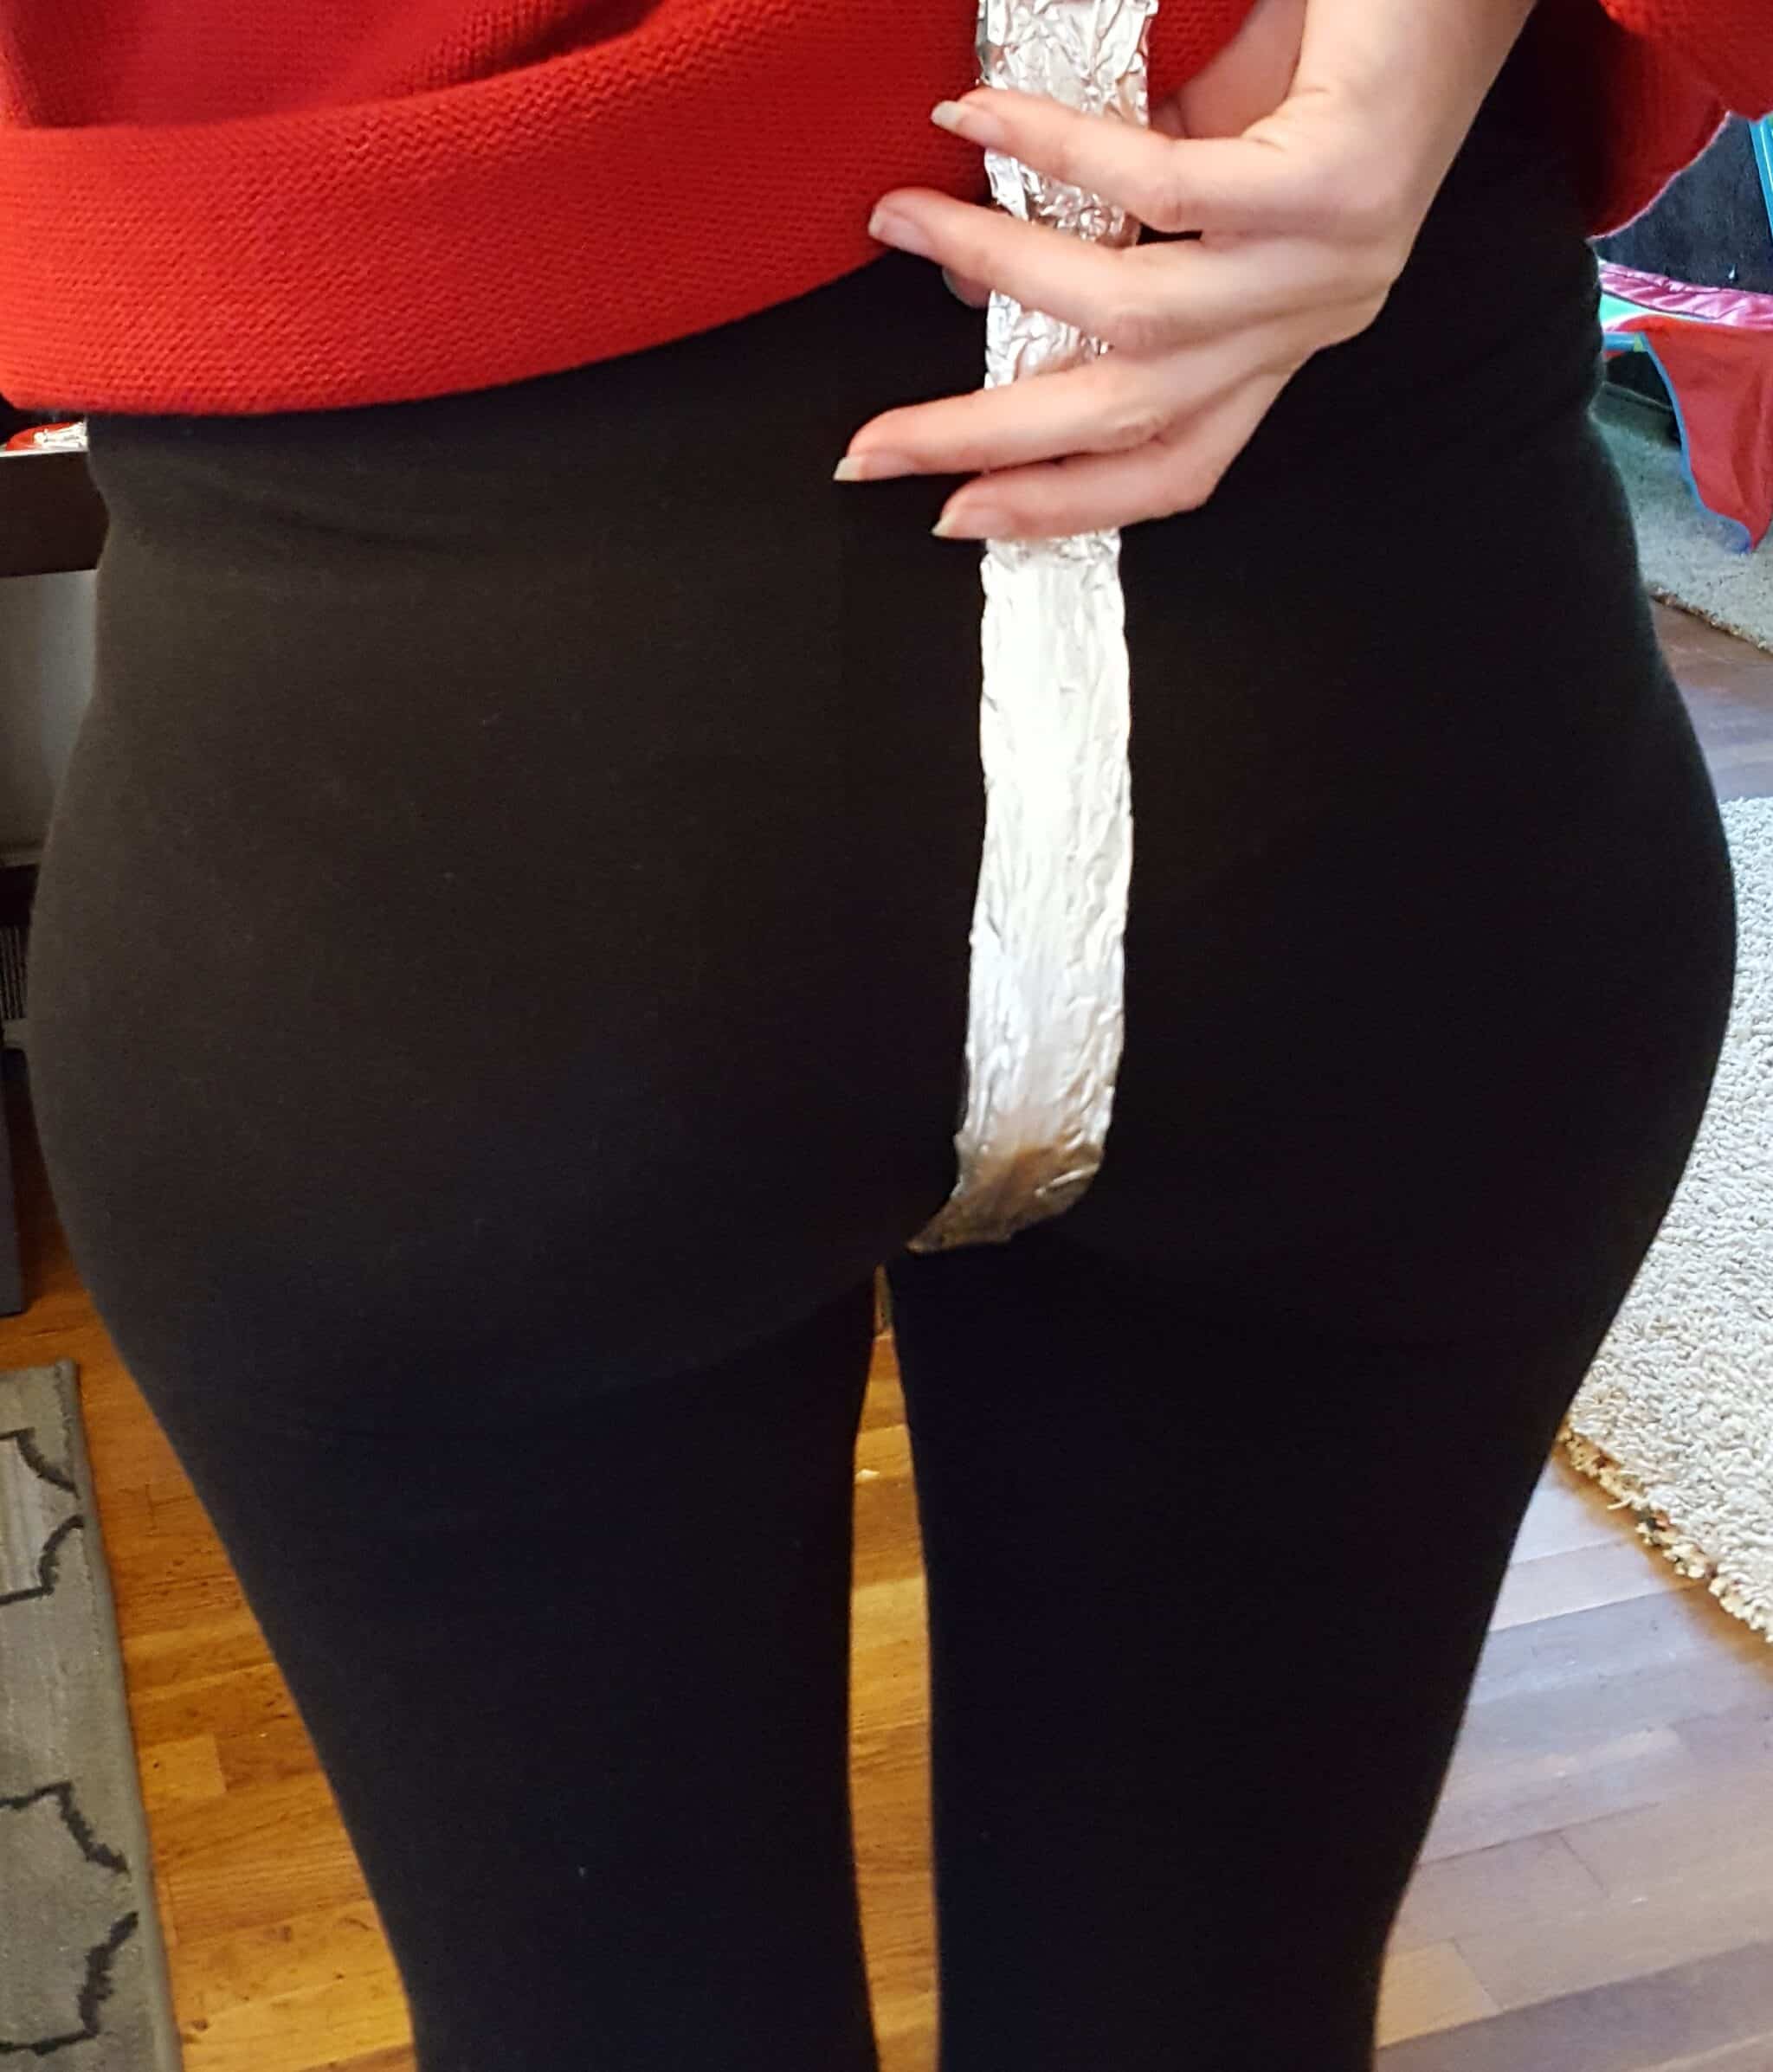
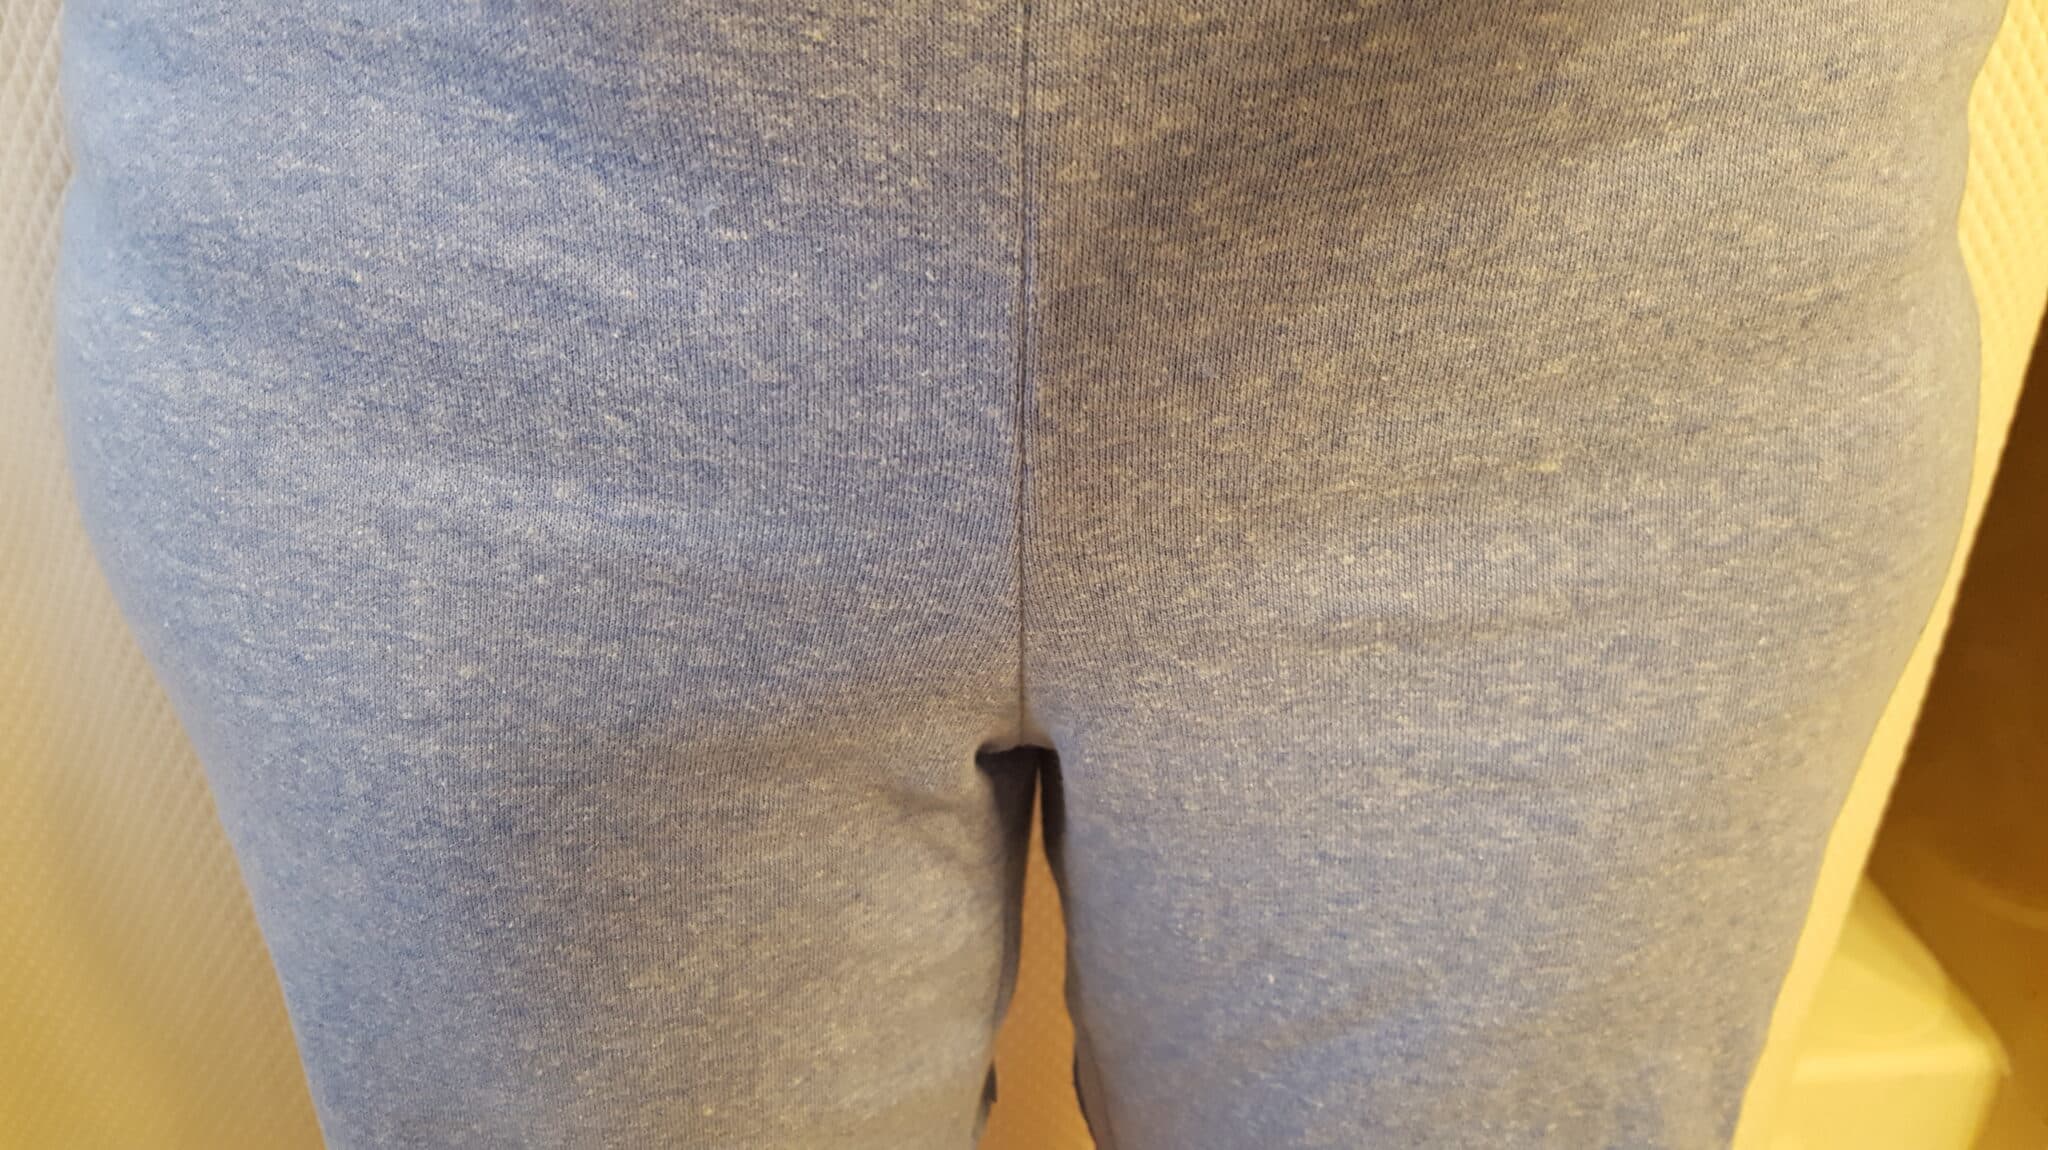
Wearing a pair of leggings, thread the foil through your legs and mold it to your curves, front and back. Mark the foil with that clip (or rubber band if using a flex ruler) at the point where your inseams come together.

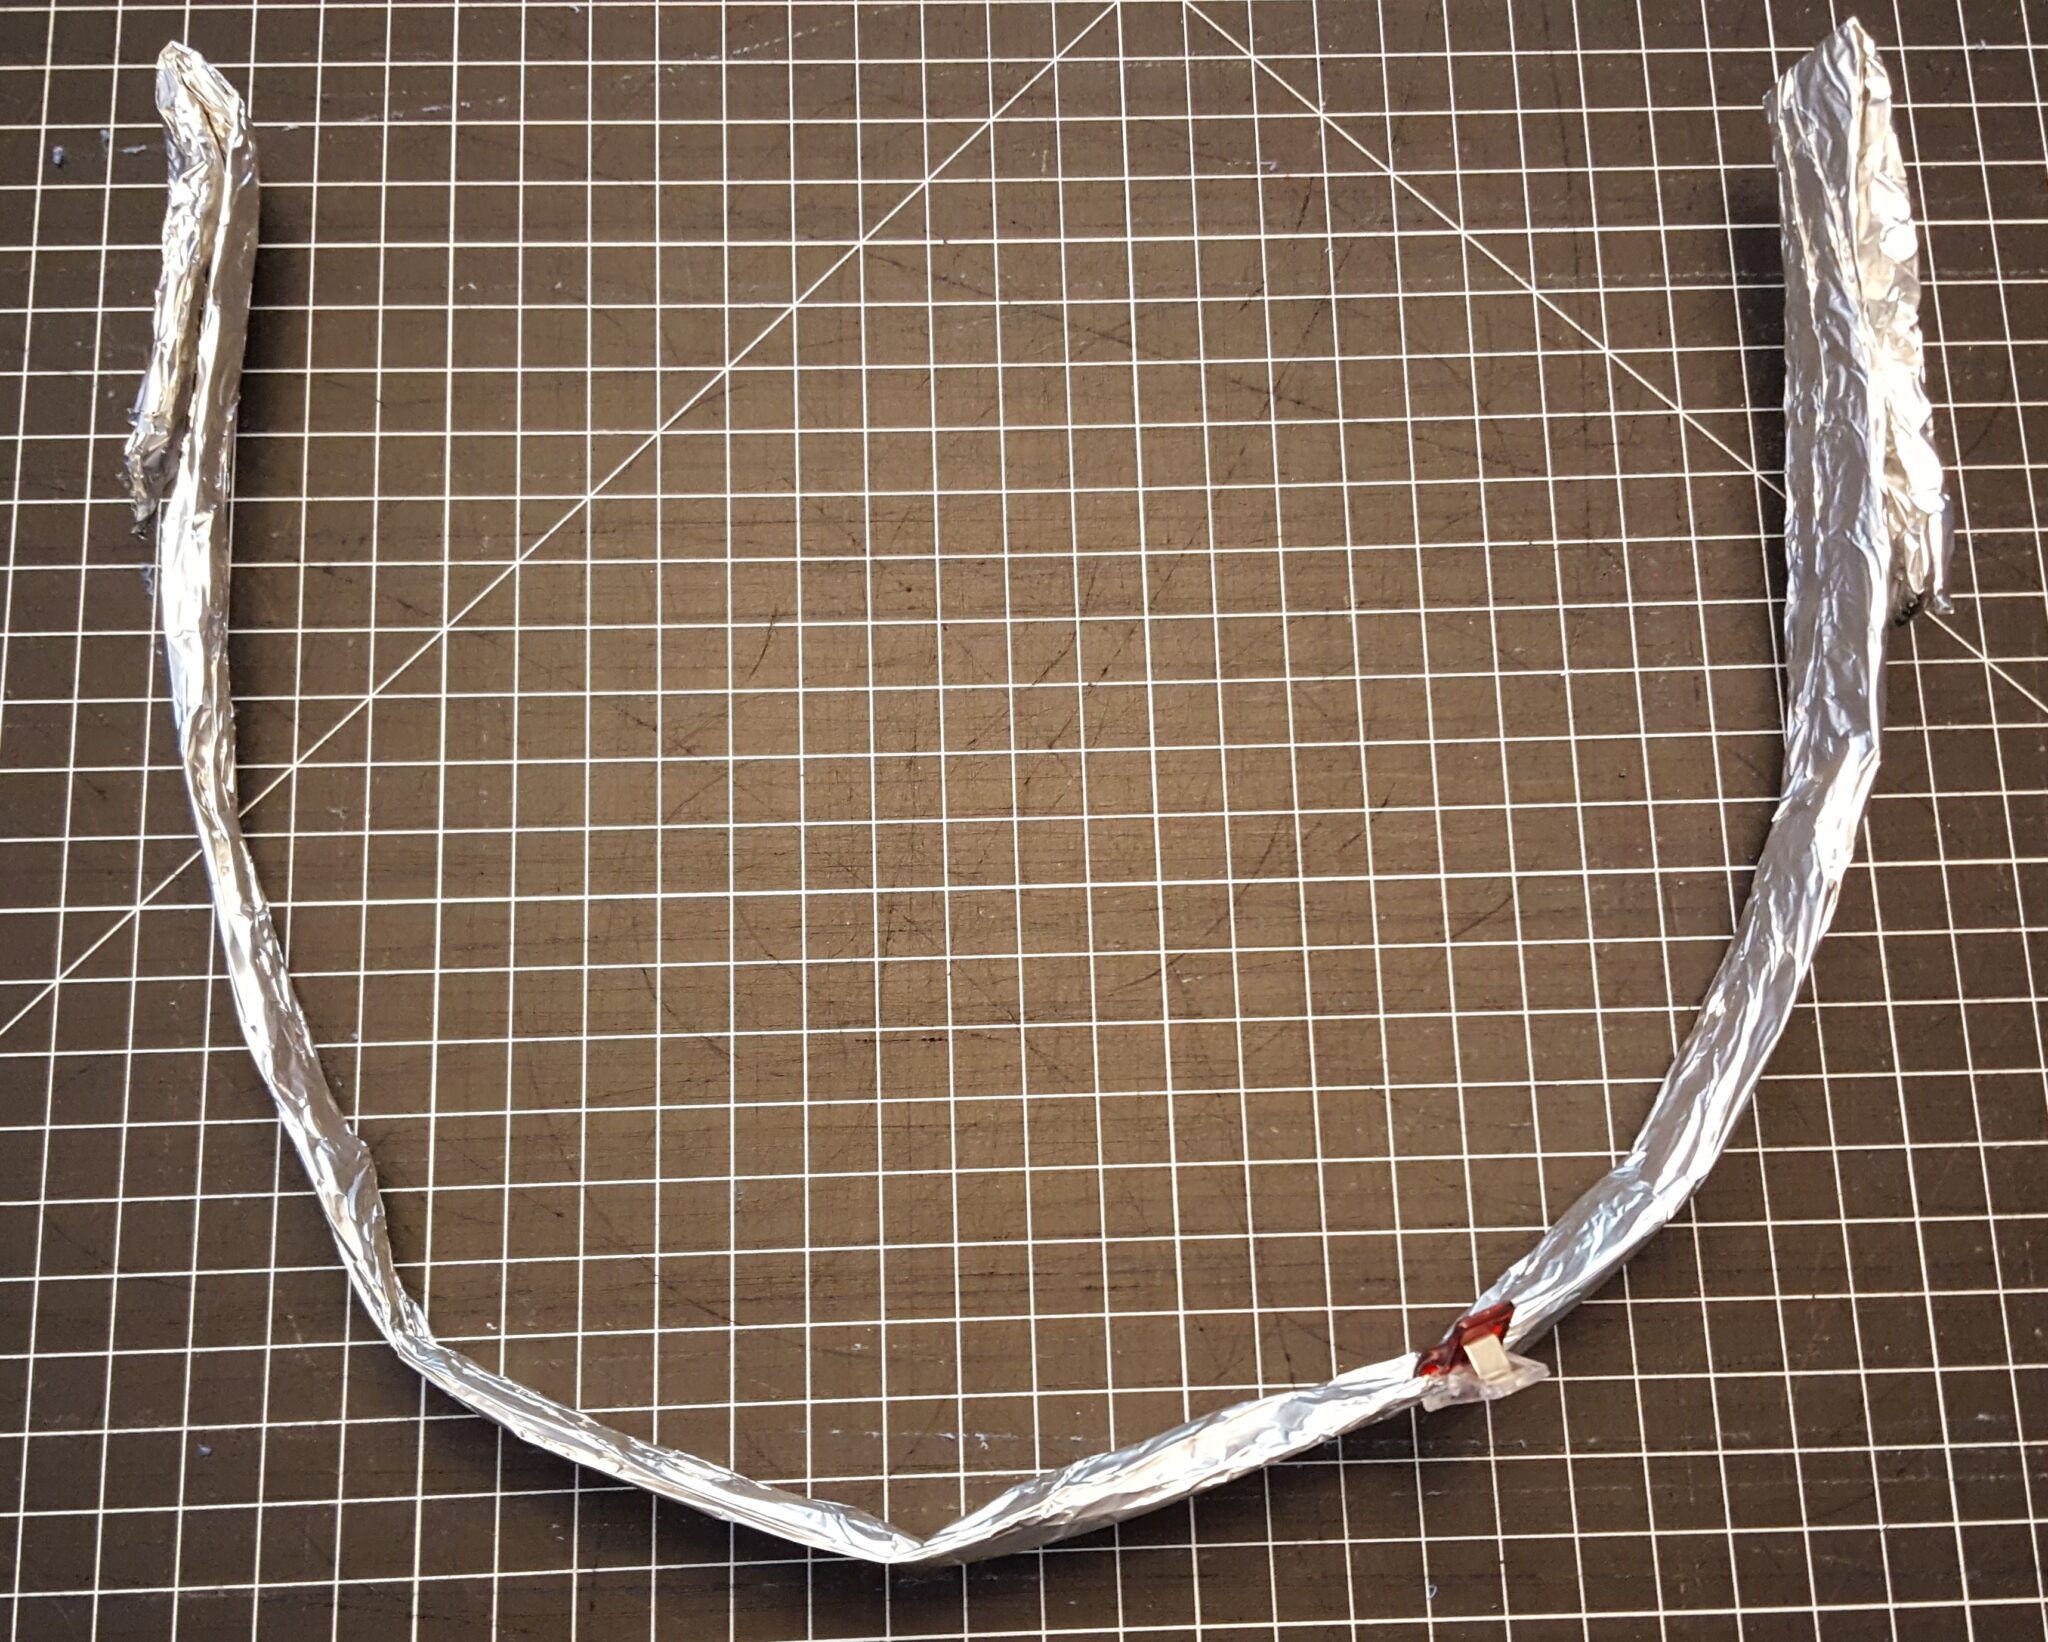
Carefully remove the foil or ruler and lay it on a piece of paper. Trace your curve on to the paper. Now repeat the entire process two more times. Draw each line on top of each other. You can see my 3 attempts here in the three different colors. I am going to cut the ‘average’ of the three. The thing to notice here is that although it varies quite a bit up at the top (because foil moves when you take it off the body), the lower front and back curves are all more or less the same. That is what I will be focusing on.
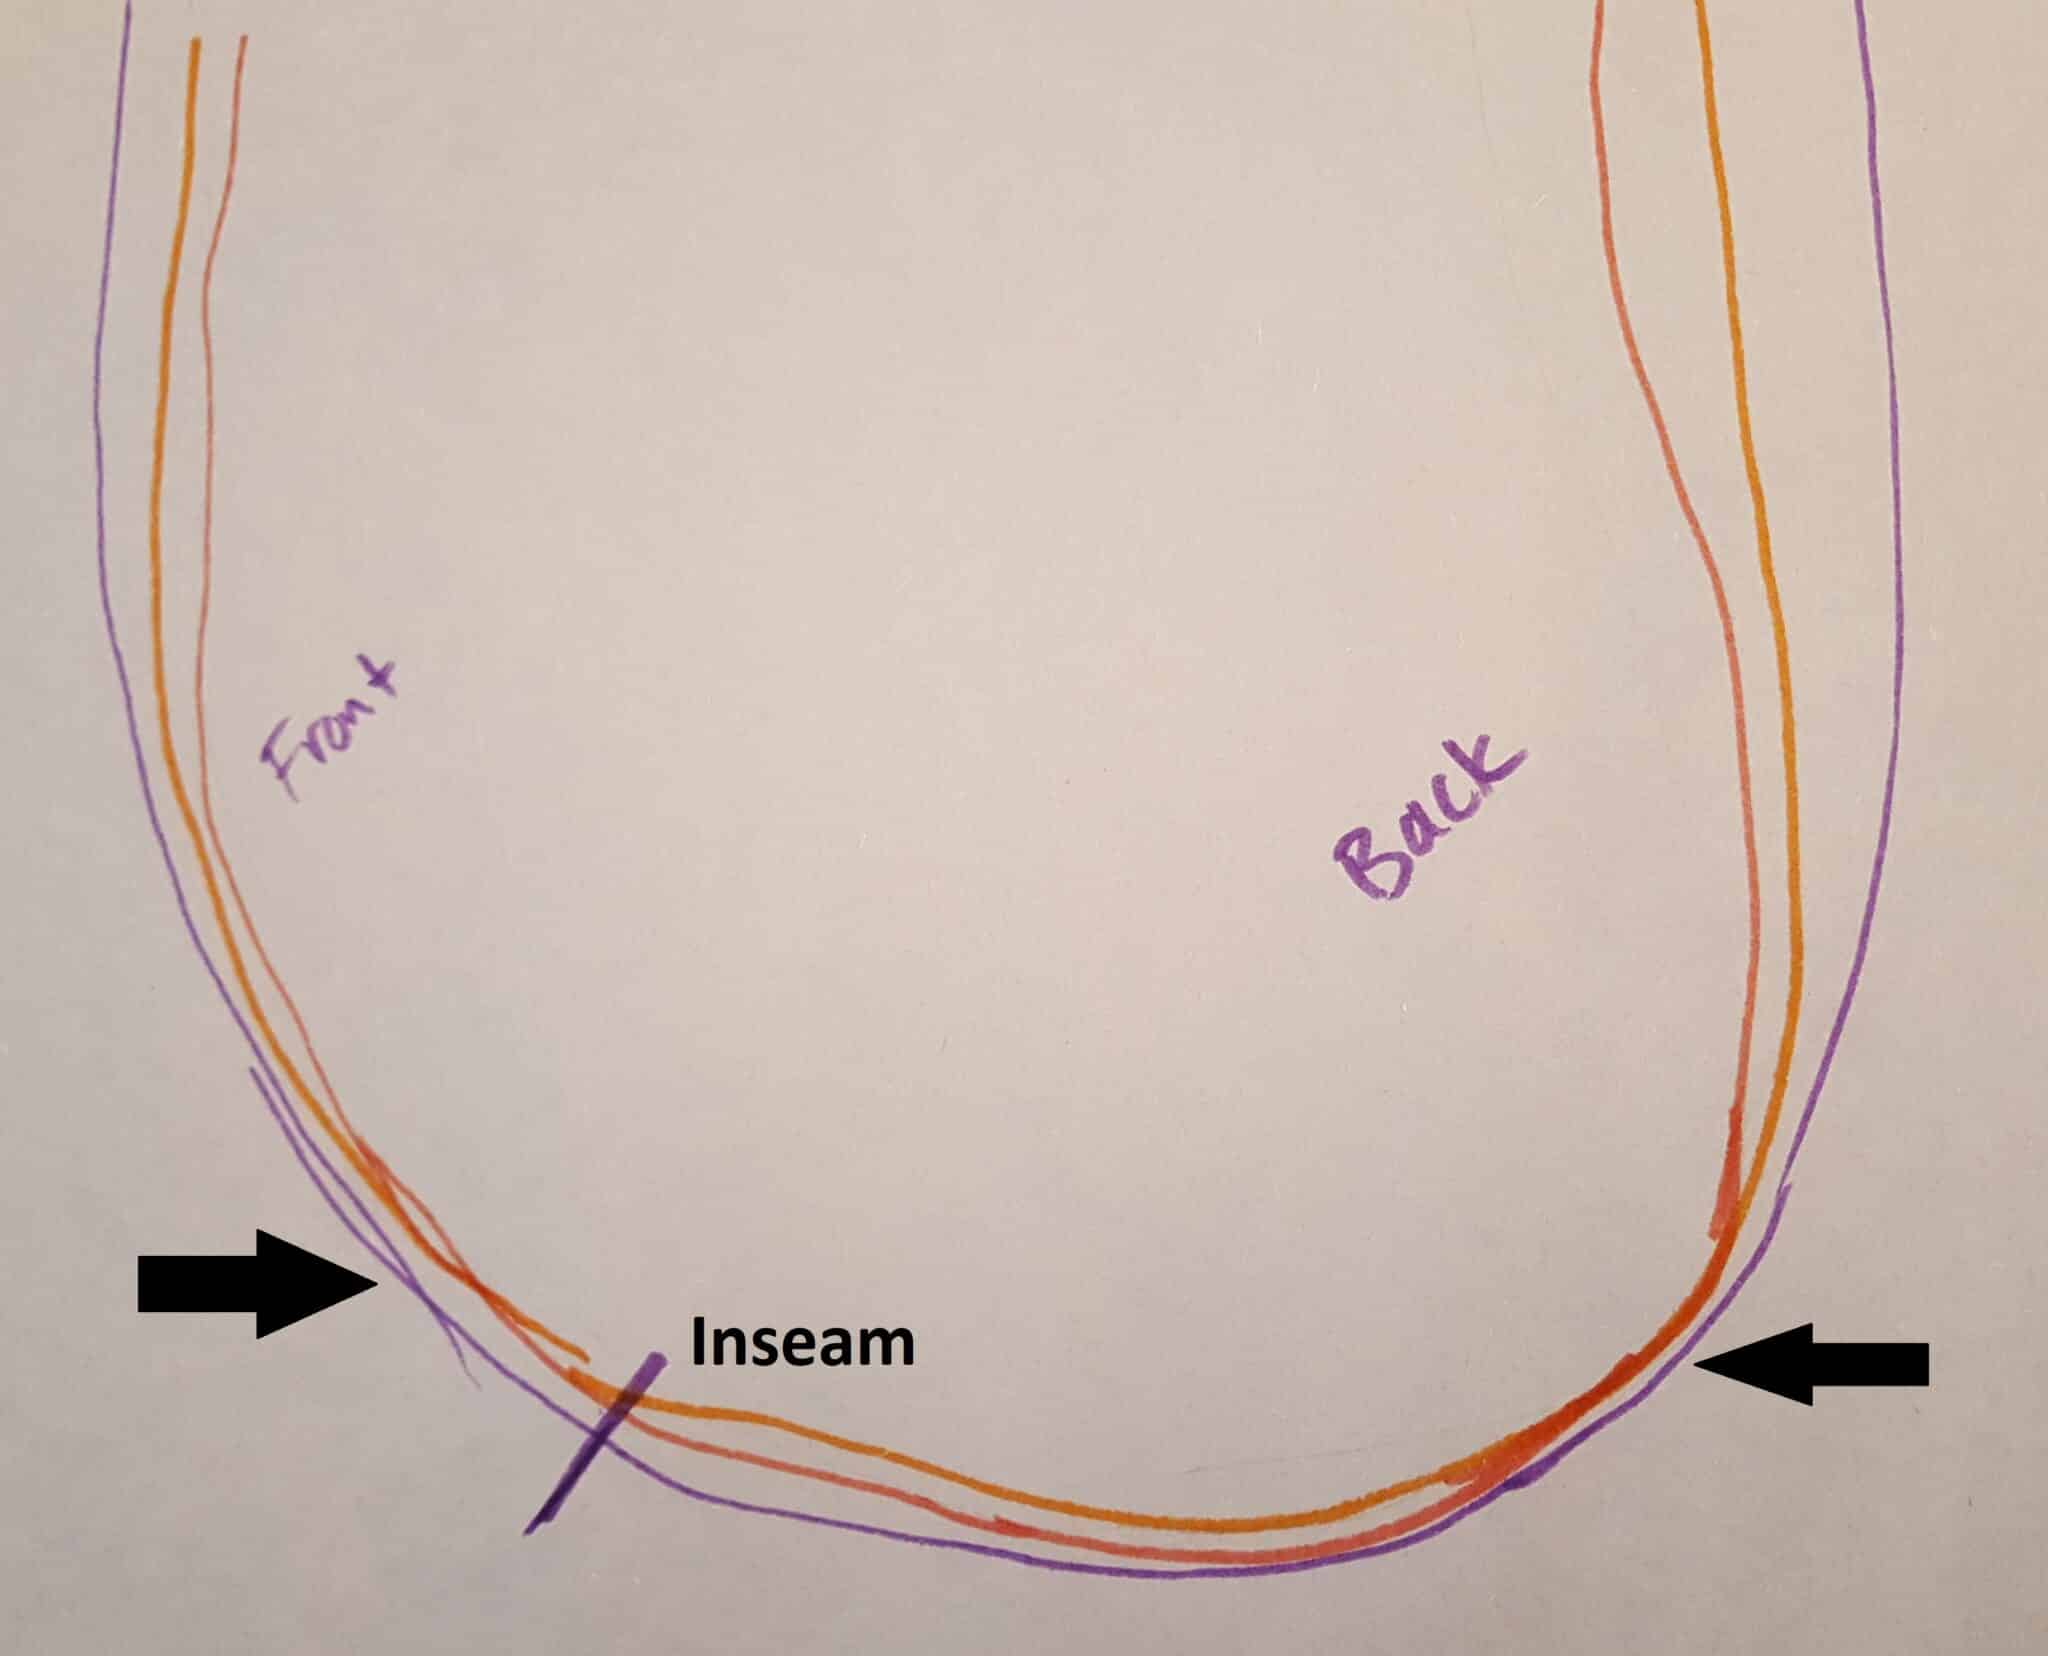
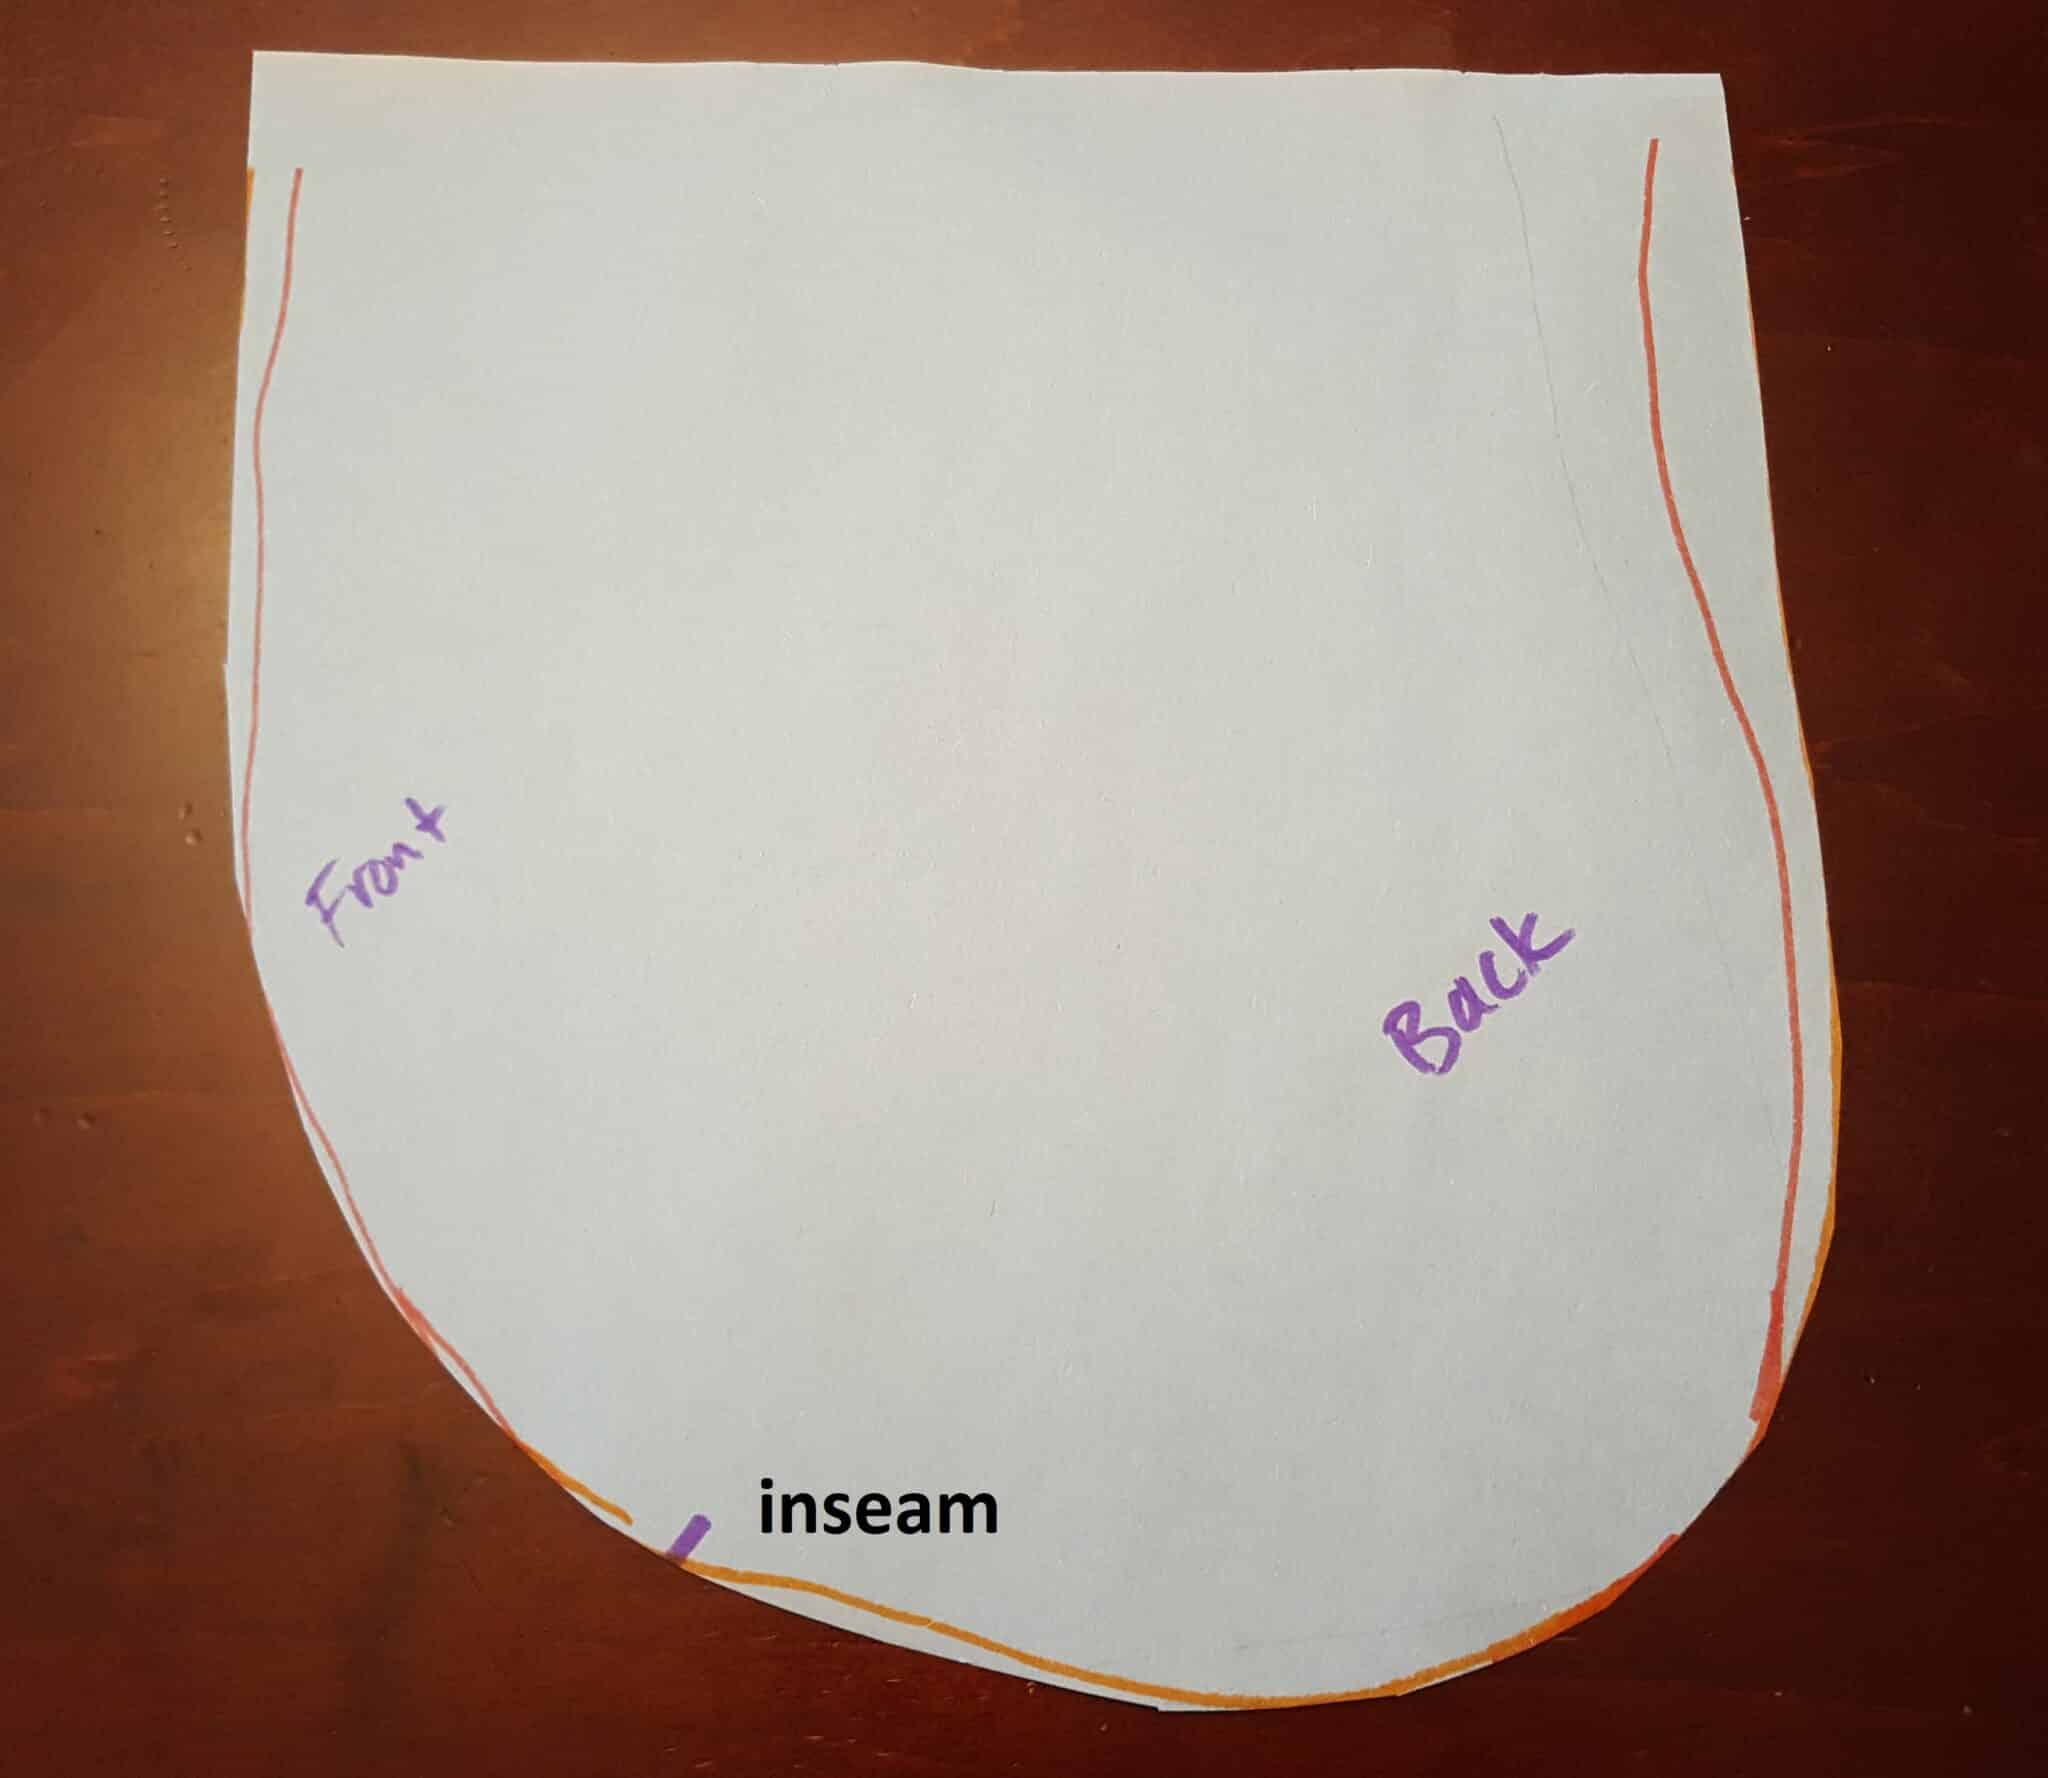
Now we’re going to get our pattern pieces ready. I’ve traced mine on tissue so that you can see better how I am going to do this.
You’ll need to line up your crotch points and overlap them by the seam allowance (in this case 3/8”). Do not worry about lining up your legs. It won’t happen and it will skew your curve. The overlap seam allowance needs to be flat. Otherwise you will end up with weird points or dips when you put your legs together. Place a little piece of tape there to hold it while we work.
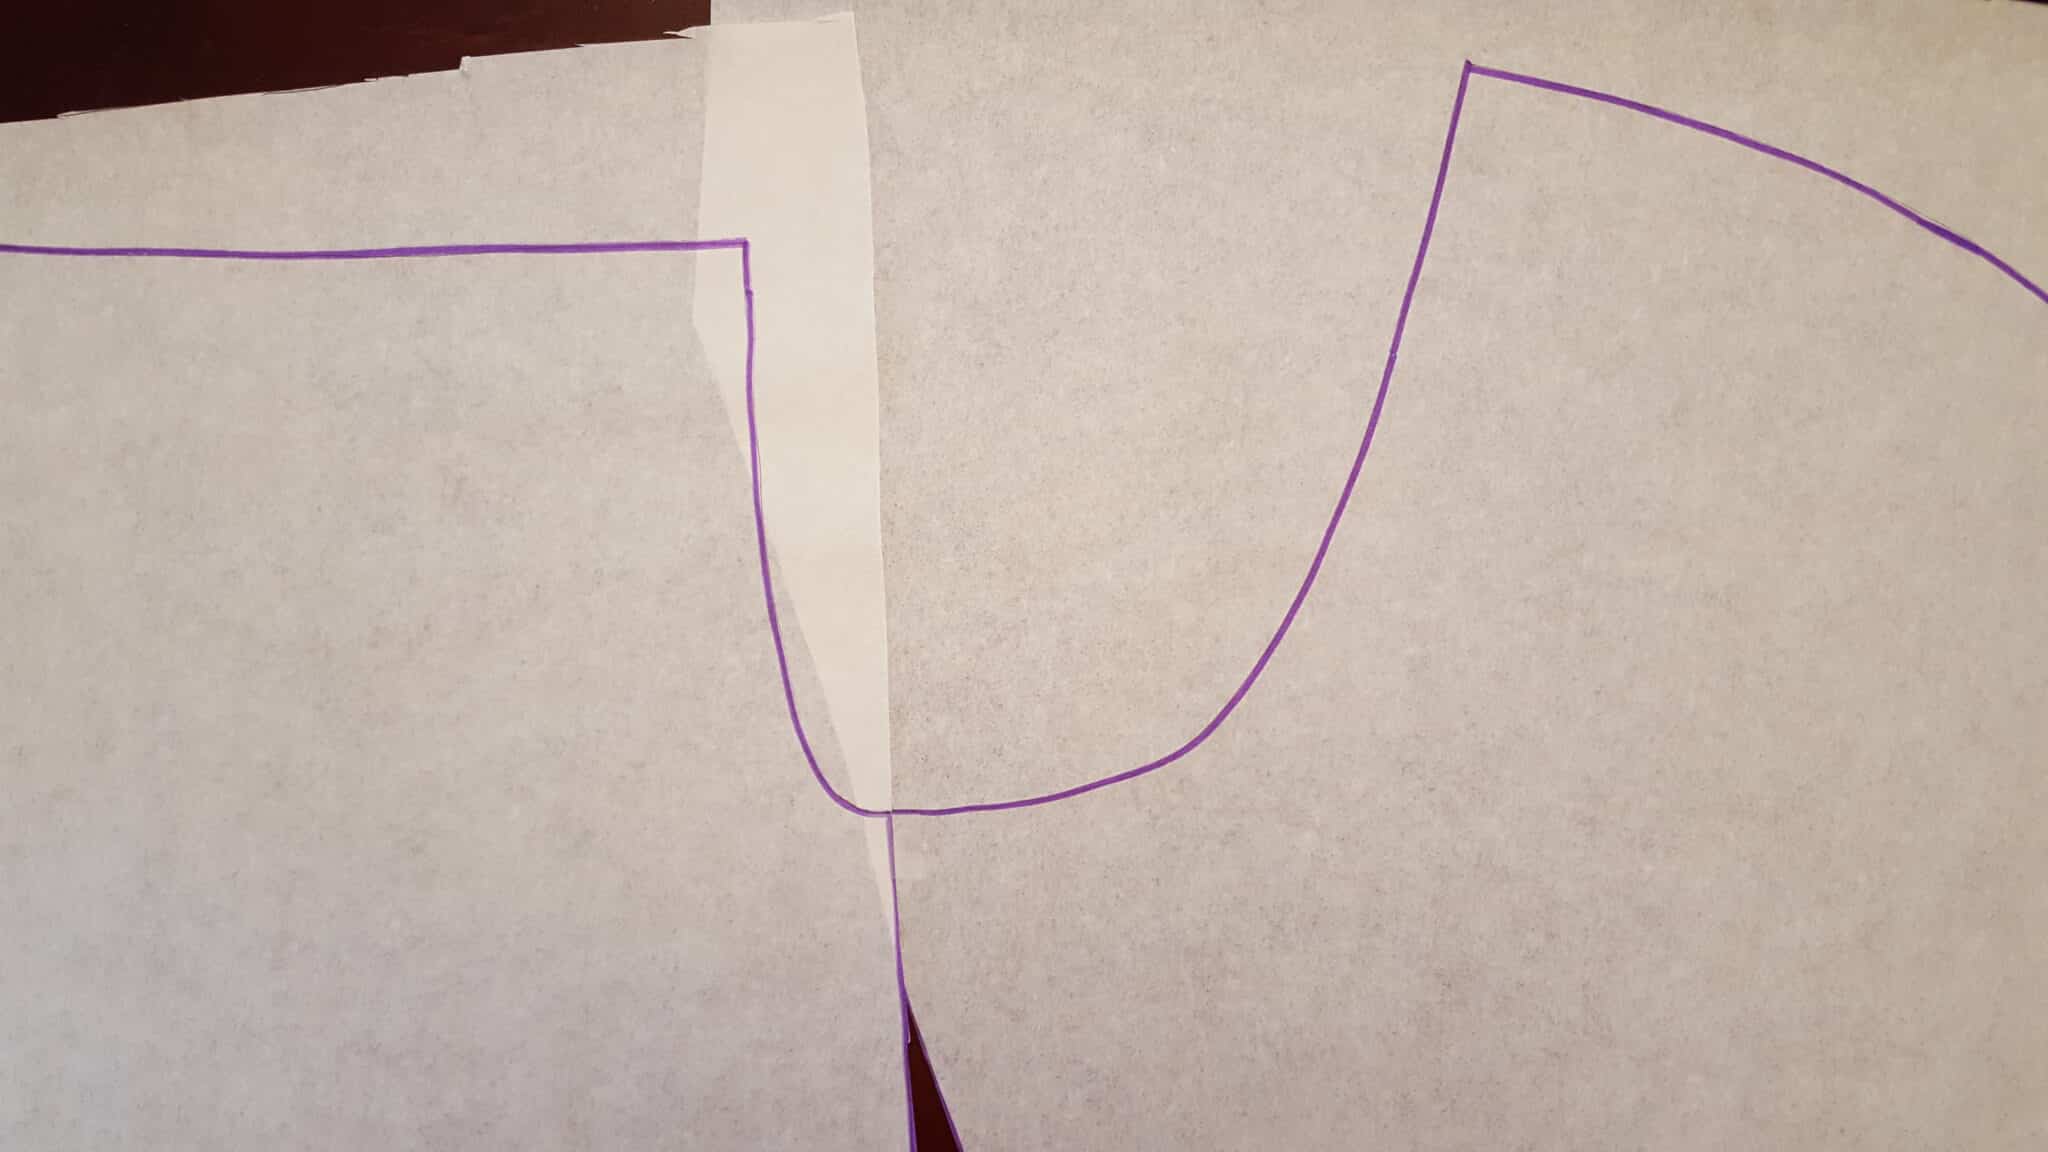
Just for fun, place your tin foil or flex ruler over your pattern pieces for your first look at what kind of a crotch curve you have. This is mine. HAHA. Wow. That doesn’t look like it belongs there at all!
Before we start making pattern alterations, this is where we get a sense of what we’re going to be doing based on your first muslin. I have compared my drag lines to my Fitting Guide and have some sort of idea what I’m looking for. If you have not assessed your muslin to the Fitting Guide, go do that now. Go on. I’ll wait…
…Ok. Here’s what I know from my muslin:
1) I have extra fabric there in the front because my pubic bones are set further back than ‘average’ (flat pubis). Making that whisker look even worse is the fact that I have a low butt and full outer thighs (saddlebags – that’s a worse term than pubis, if you ask me). Bringing me to point two.
2) Looking to the back, you can clearly see that even though I graded out one size in my back pattern to accommodate my booty, it’s just not enough. The fabric is pulling and clinging in unflattering ways. I also have a sway back that makes things look weirder up at the top, but that’s independent of this particular tutorial.


Let’s see how the visual cues of my muslin compare to the foil crotch curve in front of me. I’m going to use my cut-out now so we can start to make changes.
Your crotch curve is NOT an exact science. You do NOT want to trace it exactly into permanence for ever and ever. It’s a guideline to illuminate your path to better fitting pants.
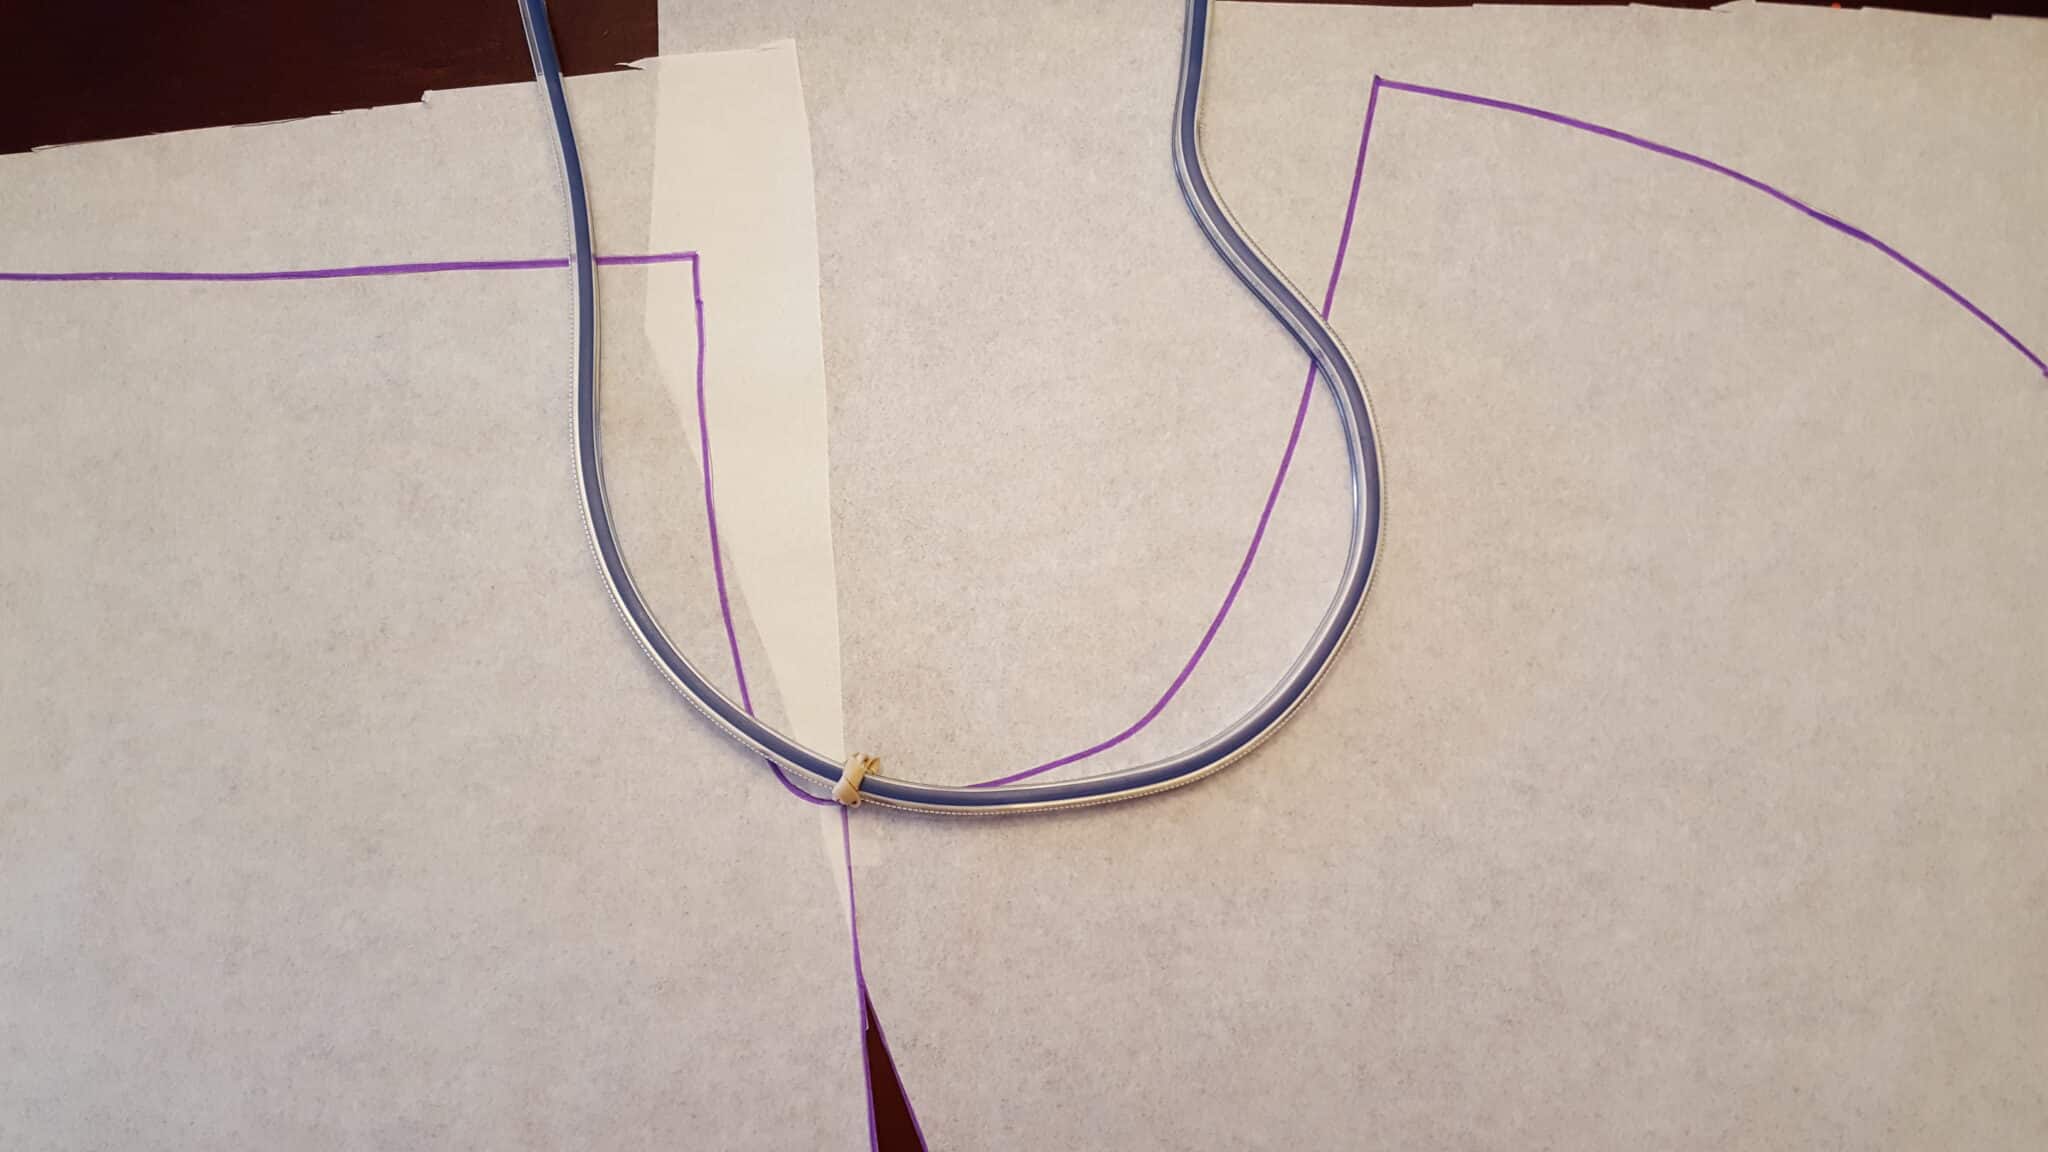
First, I’m going to draw a horizontal line at the crotch line across my entire pattern (the bright pink highlighter). Then a second line, this one vertical, from the top of the back rise, perpendicular to my first line. You can do the same to your front pattern if you are going to be need more extensive alterations up there. These are strictly guidelines so I can keep my curve on the flat and from getting too out of control.
Next, position your crotch curve so the inseams line up and rotate it a bit so that the bottom curve is flat-ish down there at the bottom. Trace it out. Mine is in RED marker.
I’m going to ignore what’s going on up on the rises. I already know I will have to address my back rise independently (the sway back). And my front fits great up top with the built in negative ease so I will leave that part alone. My focus is the bottom curves. Looking at the front there, I can see where my flat pubis is. I clearly need to flatten the front curve a tad. That tiny bit will make all the difference for me.
Aaaaand let’s look at that back. Yikes. No WONDER my pants look like that. That’s about 1 1/4” scoop beyond ‘average’. My booty is anything but average!

Now that I have a good idea of what changes I need to make, I’m going to begin smoothing and sketching. I’ll be doing this with GREEN. I am going to start with the front. I need to make that front curve approximately 1/4” shallower (translates to less fabric on my body). I’m going to smooth that curve up into the front rise.

That back… yowza. I’m going to add 1” into the scoop instead of the full 1 1/4”. I can always take more out later if I want to and my gut tells me I don’t need quite that much. Again, I’m not exact. Just using a bit of drafting intuition and smoothing the curve from the crotch point up to the rise. Ish.

Lastly, I need to add back the fabric I scooped out of my back crotch curve to the side seam. If you have a flat bum and are scooping out your curve, you may not need to add it back. Or not add as much. Like I said, trial and error. For me, I KNOW my ‘saddlebags’ (yuck) need the room, so I am going to curve that outseam back out by 1” to retain the width of the fabric.
*NOTE* Anytime you are extending or reducing outseams, inseams or crotch points, your leg seams will no longer match up. You will have to do some evening out before finishing your leg. It may not be noticable if your changes are small, but changes like this will absolutely throw it off.

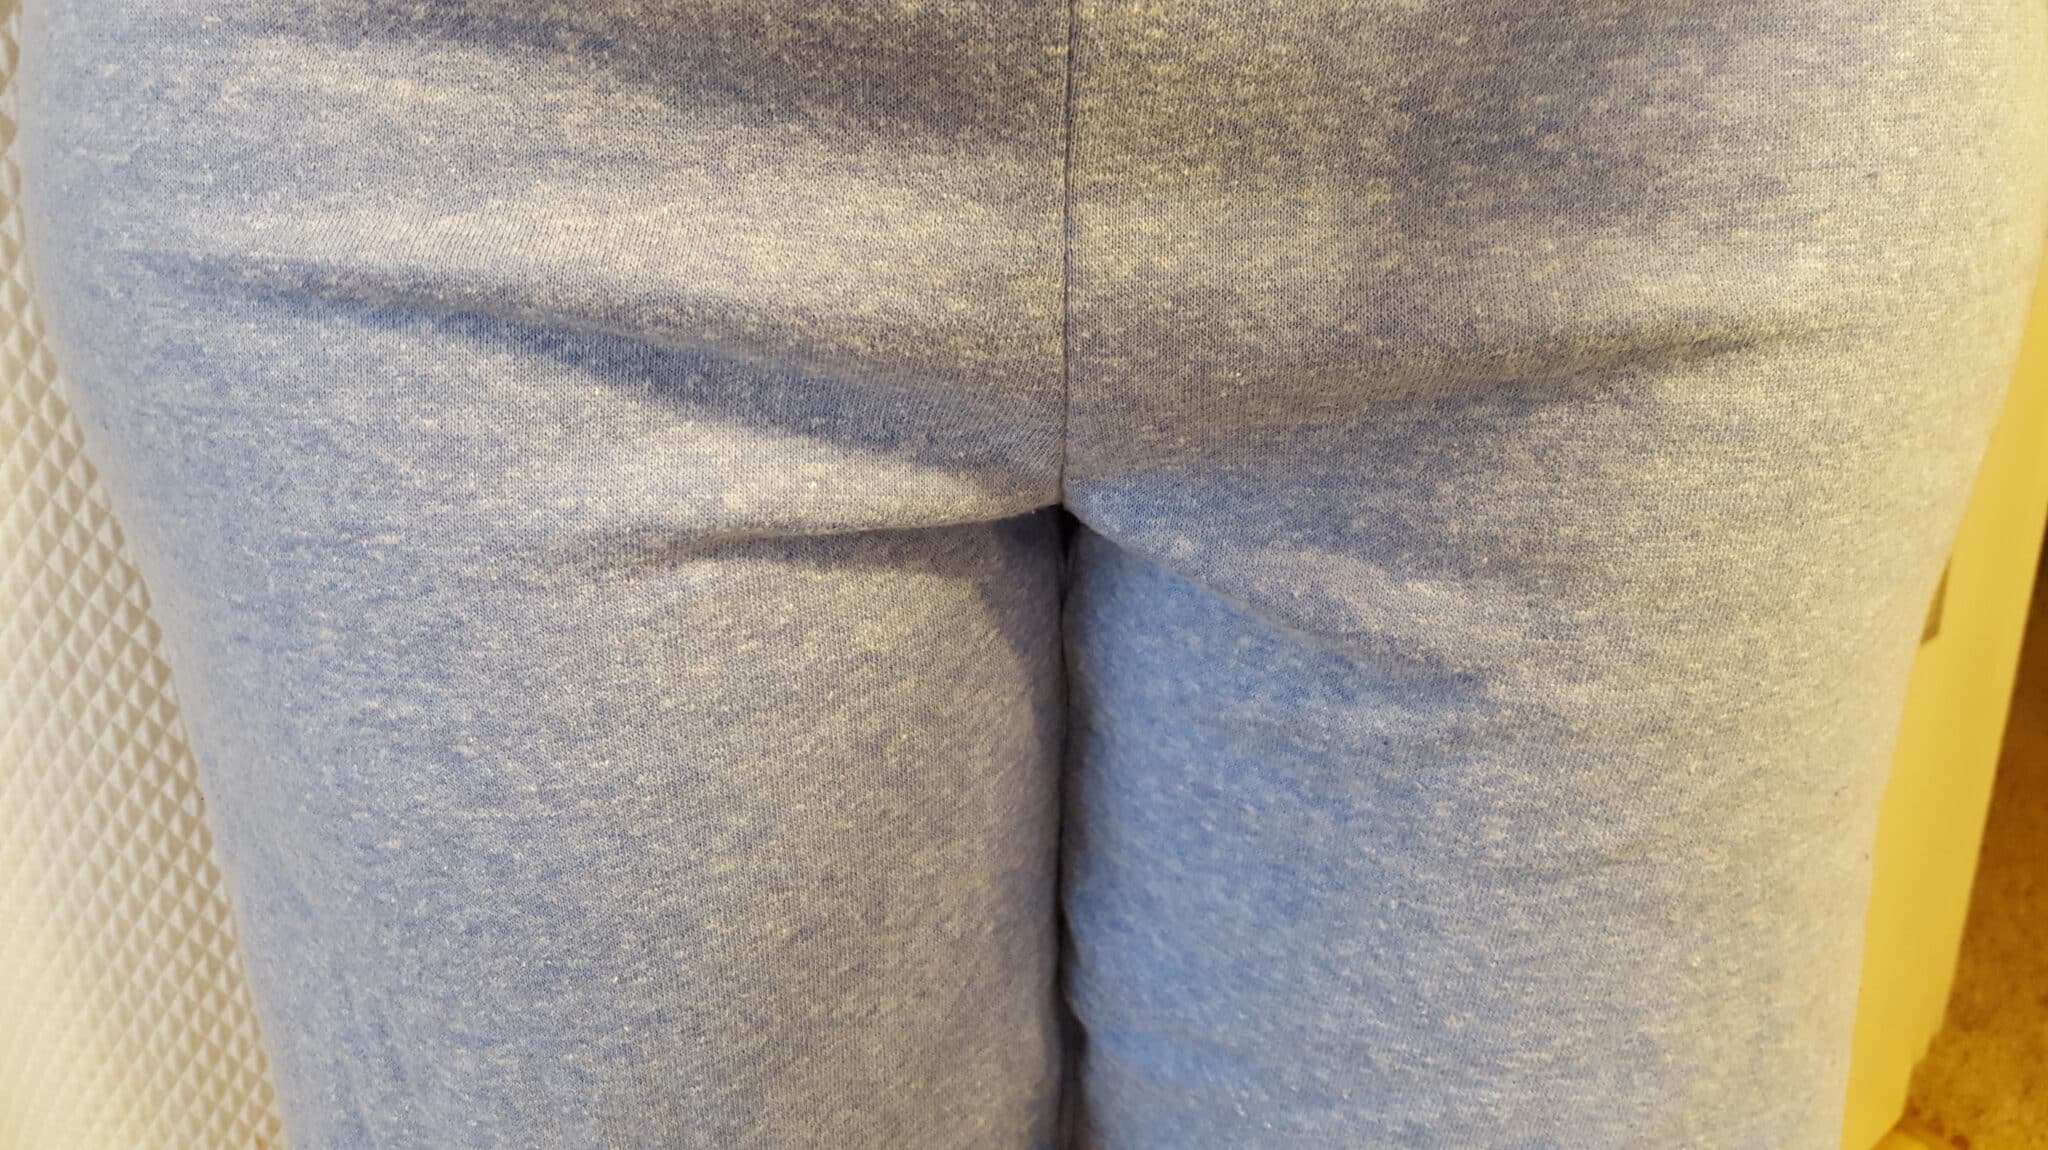
That’s it. Make your next muslin and see what effect your changes made. You may want to make more. I went on to make my sway back adjustments, as well needing to slim my outer thigh back DOWN a lot more after my fullest point. But just LOOK how much better my second muslin is!


If you want to see me explain the process in action, check out this VIDEO.
Disclaimer – I am not comfortable on camera so I apologize in advance for any awkwardness and bad jokes.
Thank you so much for this post! I’ve taken online classes re pants fitting but NOTHING I’ve seen has even come close to this pants fitting guide! I feel as though I’m ready to take this one. I’ve made myself a couple of pairs of knit pants and LOVE this pattern for it’s fit opportunities 🙂 I did get them right. I’ve also made leggings with success but woven pants are a completely different matter. I made myself one pair that looked so silly I was horrified. I’d REALLY like to make myself a nice pair of linen pants but getting the fit right on woven is really challenging! I feel as though with this post I might have a chance 🙂
Another great article. I had used a flexible ruler to trace my crotch curve but wasn’t sure how to apply it to my pattern. This will help me. Thanks for sharing.
This is fantastic!! I’ve always been intimidated by major alterations so never attempt them. So enlightening. Thank you for providing this info.
Good for YOU!! We look similar back there w/ me being “shorter” vertically! I need to alter some britches I already have & have ALWAYS wanted to construct my own but after just one attempt a couple of years ago I ‘ass’-umed I was in NO shape for making my own pants! (Pardon the pun) But, (another pun) I feel w/ this bit of info I MAY be able to do this!!! Thank You & I look forward to watching the video also!
Fabulous ldea will definitely try this thanks
Great teaching! Thank you for clarifying how to fit the pattern to the person.
This is a new method for me ,so thank you for sharing the knowledge
Can’t wait to try this! Thanks for the video too! You rock.
Wow! Awesome fitting. Great method. Thanks!
Wow the fit is amazing after your method. Thanks for the great advice. Elaine 🙂
That is REALLY helpful. I have a similar shape but am much bigger. I also discovered that my crotch is angled and that my butt dips lower so need to scoop below the crotch seam on the back only. Maybe I have a tipped pelvis?
Wow!
Was für ein hilfreicher Post!! Ich werde demnächst mein Schnittmuster nach deiner Anleitung ändern….
Herzliche Grüsse aus der Schweiz
yase
Thank you so much I have tried my size 20 to sew a bottom pajama I ended up giving it to a friend. I have a large stomach I know and from patterns to my body there some things I have to modify but there looking at that how it clicked all together no I know what to increase thank you so much
Wow! Thank you for not being straight up and down. I can adapt this to my curves and finally have pants that fit. Thank you for showing me how to look good in my body.
Good examples with clear explanation of concepts. Before and after are perfect. Fun read too. Good job.
This was great. Very well explained. Thank you so much.
Woooooow! What a great explanation and outcome! It looks great! Thank you for sharing!
YAHHHHHOOOO. Thank you so much. I have the same problems, and the tin foil explanations up to now were not explained as to how to use! THANK YOU! All the information I found cautioned not to drop the crotch scoop more than 1/2″ but mine was way larger. You are marvelous.
Awesome tutorial, thanks.
Great idea, the other thing that needs to be done that can help with the fit, just like a bust there is a roundness in your hips. So I think there needs to be adjustments within the pattern just like you would adjust a cup size in a dress. Thank you for this great idea it is really helpful and inspiring.
Fantastic…thank you.
Not only helping us ladies have better fit but celebrating different and beautiful bottoms whatever the size or shape….none of them are wrong! x
Excellent tutorial. It all makes perfect sense. Will definitely give this a go. Thank you so much!
Excellent!! I will definitely try this!!
This is so helpful!! I had just given in to the ineviatable whisker front on all my pants. It’s not just unsightly, but uncomfortable. So excited to try this on my next pair of pants!
Thankyou for excellent tutorial. I also have a very similar shape to you. One day I’ll be native enough to try!!
Brave enough….
I am such a beginner sewer, and things like crotches and arms terrify me. My attempts were always…something not to be talked about ever again. This is so helpful, I am going to go give this a shot! FETCH THE TIN FOIL!
Thanks for this tutorial and you are not awkward on camera and the video was a huge help.
This was incredibly helpful. You may feel awkward but you come across as intelligent and friendly. Thanks!
Thank you so much for this article and the video. I think this will be a huge help for me. I appreciate you sharing your knowledge.
SO clever & useful ! Thank you so much to share this article